- V
- GF
- NS
- DF
- View Recipe Key
How to Make French Macarons: Step-by-Step Tutorial (VIDEO)
How to Make French Macarons: Step-by-Step Tutorial (VIDEO)


Learn how to make perfect French macarons at home with this detailed tutorial, which includes step-by-step photos, clever tips, flavor variations, troubleshooting resources, and even a video masterclass!
This post contains affiliate links. Full disclosure is at the bottom of the article.
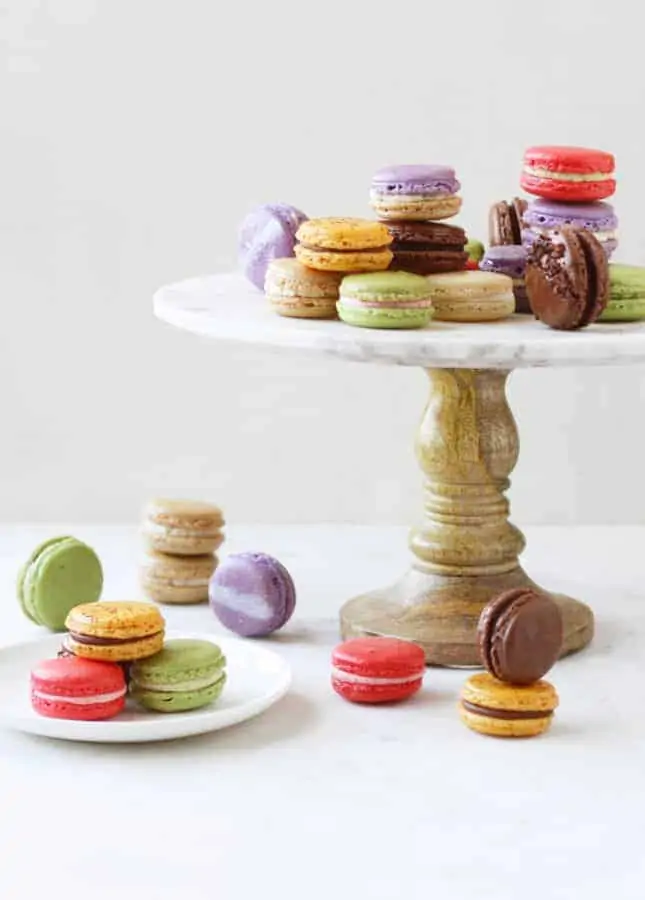
French Macarons are a delicacy I am completely crazy about. My favorite macarons are sold at Pierre Hermé, in Paris, and it’s tasting the French treat in that shop for the first time, almost 20 years ago, that sent me down a rabbit hole. Coming back home after that first trip to Paris, I was obsessed with macarons. On subsequent trips, I took classes to learn how to make French macarons, yet as I experimented in my home kitchen, I realized making macarons is not an easy task, and it requires a lot of patience. I learned the hard way that French macarons are capricious little wonders: change the ratio of ingredients even just a tiny bit and your delicate balance tips over. I’ve seen many trays of overbaked, flat, cracked, or overinflated macarons coming out of my oven!
Over time, I perfected my technique and recipe and began teaching others to make them. No macaron recipe can guarantee a perfect result. Here’s what you need to be successful at making French macarons:
- Time: Carve a couple of hours in your schedule for your first attempt. Make the fillings in advance to concentrate on the shells when you have the most time on your hands.
- Patience: Read the full recipe very carefully a few times before you get started. Don’t rush through the process.
- Practice: Test the recipe with your own equipment, ingredients, and oven. Adjust as needed.
- Resilience: Your macarons might not look as perfect as you’d like them to. You might fail entire batches. Every batch of macarons will teach you something, and that is how you’ll master them.
You likely will need to make French macarons several times before you achieve perfection—that is, a result that makes you happy and proud. After all, if French macarons were so easy to do, wouldn’t everyone make them?
With experience, I noticed that there’s nothing better than watching someone make macarons to learn how to make them properly. This post is as close as still photos can get you to a step-by-step demonstration. If you prefer video, watch my FREE, detailed French Macaron Video Masterclass on YouTube, the one place where you’ll find ALL my secrets and tips to make French macarons.
NEW: French Macaron Video Masterclass
Learn how to make perfect French macarons at home with my detailed video masterclass, now available to everyone for FREE and unlimited watching! This masterclass was previously hosted behind a paywall on an educational site where THOUSANDS of students rated it 5 STARS! It’s now available to all macaron lovers worldwide, for absolutely free ❤️
My detailed French Macaron Video Masterclass is divided into 14 handy lessons that will make you a macaron expert in no time. I designed my masterclass both for novice bakers who want to learn new skills, and for experienced bakers who are seeking to master a new and impressive dessert. Let me guide you through the essential equipment you need, the important steps to follow, the techniques to master, and the potential pitfalls to avoid. You can watch the videos on your own time, start practicing, share with other budding macaron makers, and ask me questions if you encounter difficulties along the way.
I’m confident that this video class will enable you to create perfect French macarons. Watch the class now!
If you enjoy my French Macaron Masterclass, make sure to “like” it on YouTube to allow other macaron lovers to discover it. Thank you and happy baking!
Are You Having Trouble Making Macarons?
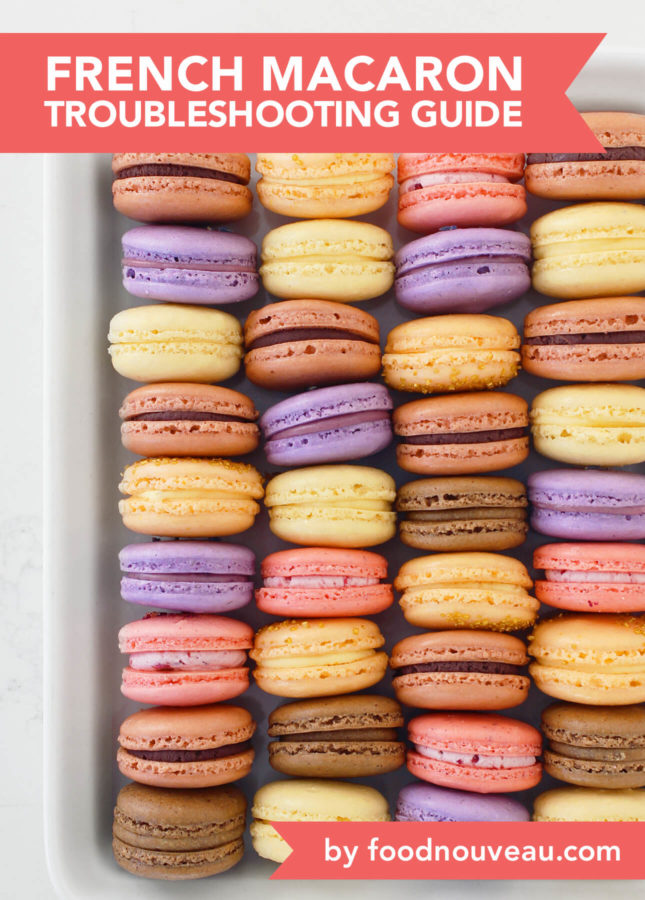
Since first publishing this post in 2010, struggling macaron-makers have asked me every question under the sun. After replying to hundreds (thousands!) of comments over the years, I decided to close the comments on my macaron posts, but I’m leaving you with an excellent resource: my Macaron Troubleshooting Guide: Useful Tips and Advice to Master the French Delicacy. This post gathers ALL of the most frequently asked questions I’ve been asked about French macarons over the years. If you’re having any trouble making French macarons, I’ll bet you’ll find answers in that post.
You can also read through the comments left below, I did my best to reply to all of them and many (if not all!) macaron issues are covered in there as well.
If I missed something, send me a note! I will keep regularly updating my troubleshooting posts with new issues that come up.
French Macarons: The Basic Recipe + Tips to be Successful
CLICK HERE TO JUMP TO A PRINTABLE VERSION OF THE RECIPE
Successfully making French macaron shells is the toughest task to achieve and the one you’ll need the most practice for. You should try to successfully bake basic French macarons before trying to mix in other flavors.
How to Get Prepared for Making French Macarons
Making French macarons requires a bit of advance planning.
- (Up to) One week before making French macarons: Make sure you have all the equipment and ingredients you need to make French macarons. You might need to order things online, or go to a specialty store to get what you need. Refer to the list, below, to get prepared.
- Two days before making French macarons: Separate the eggs: place the egg whites in a clean glass container and reserve the yolks for another use. Refrigerate the egg whites, uncovered, from 24 to 48 hours.
- The morning of the day you plan to make macarons: Take the egg whites out of the refrigerator and leave them to temper at room temperature for several hours.
The Equipment You Need to Make French Macarons
Gather all the equipment you need before you get started. You might need to purchase new tools–yes, that kitchen scale is required. The good thing is that none of the following tools are specific to making macarons so your new gadgets will help you make many other great desserts. Please, do take this excuse and go shopping!
- Kitchen scale (required)
- Food processor (nice to have but not mandatory, see Step 2, below)
- Hand mixer or stand mixer
- Fine mesh strainer
- Large stainless steel bowl (also called a cul-de-poule—not required if using a stand mixer, you can use the mixer’s bowl)
- A second large mixing bowl
- Silicone spatula
- Pastry bags (I recommend using large disposable bags, see Step 7, below)
- Round pastry tips (1/2 to 3/4 inch opening, sizes 6 to 8)
- Round pastry tips, preferably 2 to 4 of them (see Step 6, below)
- Parchment paper (I recommend using parchment paper sheets, which perfectly fit standard half sheets)
- Gel food coloring, if desired
The Ingredients You Need to Make French Macaron Shells
- Egg whites: 3, from large eggs, separated at least 24 hours in advance and kept in the refrigerator
- Powdered sugar, also called confectioner’s sugar: 210 g
- Almond flour, also called ground almonds, or almond meal: 125 g
- Granulated sugar: 30 g
- Cream of tartar (meringue stabilizer): 1/4 tsp
How to Make French Macaron Shells
STEP 1: PROCESSING THE ALMOND FLOUR/POWDERED SUGAR TOGETHER
Weigh the powdered sugar and almond flour and put them in the bowl of your food processor. Finely grind the two together for a minute or two. Stop the processor, scrape the sides and bottom of the bowl, and process again for a minute.
Yes, you need to do this step even though both ingredients are already powdered. This step blends the sugar and nuts perfectly together and gets rid of bigger bits that often remain in packaged almond flour.
You can grind whole almonds. Use raw almonds, unpeeled or blanched. If you use unpeeled almonds, the brown peel will give a speckled look to the macaron shells. To very finely grind almonds, put them in a food processor along with the powdered sugar. This will prevent the almonds from turning into butter.
If you don’t have a food processor, you can still make macarons, but make sure to thoroughly blend the almonds and sugar together. The consequence is that the texture of your macarons might not be as smooth.
STEP 2: SIEVING THE ALMOND FLOUR/POWDERED SUGAR MIXTURE
After processing the powdered sugar and almond flour, you need to sieve the mixture. This is really important (especially if you don’t have a food processor) as it will get rid of the remaining bigger bits and ensure a smooth batter. You will see some of the almond refuses to pass through your sieve. Don’t try to force it through; it’s ok to throw it away. If you don’t remove more than 1 teaspoon of larger bits, your ingredient ratio will still work.
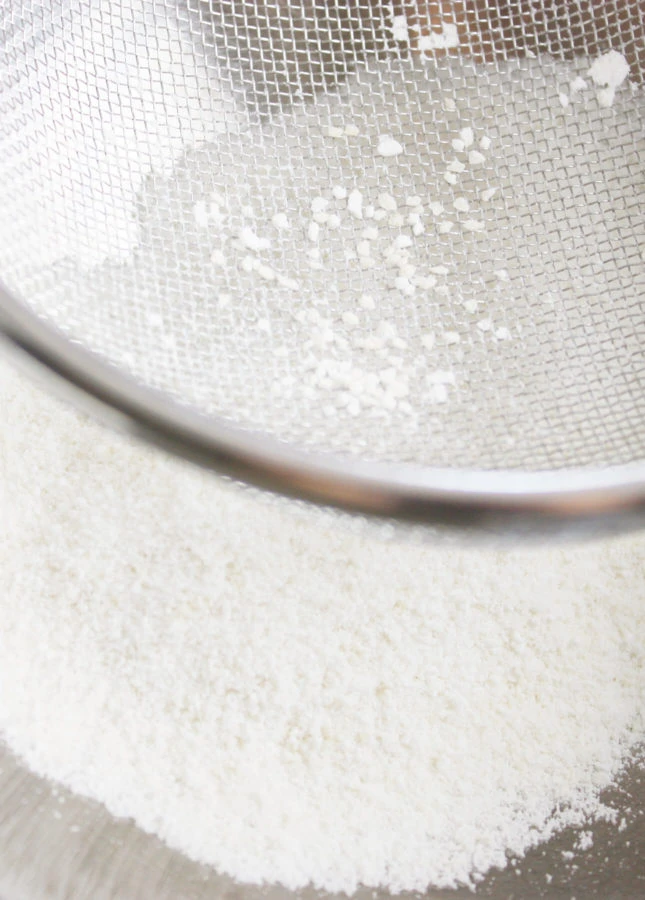
Set the sieved ingredients aside.
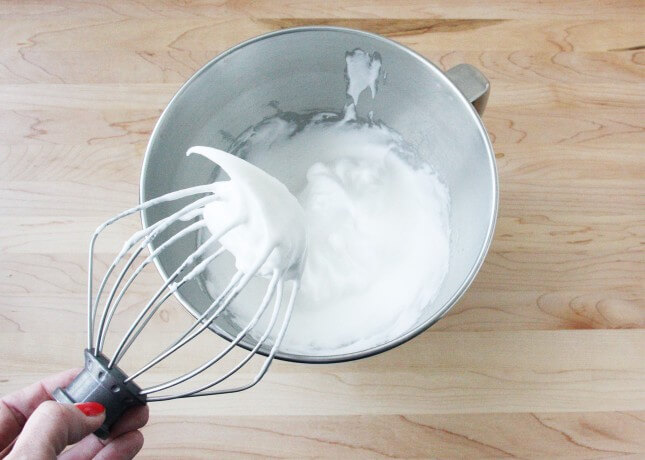
STEP 3: BEATING THE EGG WHITES (making the meringue)
Get a large stainless steel bowl out. This kind of bowl is called a cul-de-poule in French and they are so useful in a kitchen that, if you don’t have one already, you should consider investing in a couple of them: one small and one large. You can get them in sets of 3 to 5 bowls, but you really only need a couple. Stainless steel bowls help to get egg whites fluffy and firm. If you have a stand mixer, the bowl that comes with your mixer works.
Make sure the bowl is cold. Stainless steel remains naturally cold, but if it seems warm to the touch or if you just washed it in hot water, rinse it under cold running water, then dry it properly before using. You can also stick the bowl in the freezer for a few minutes before using it. A cold bowl also helps to get the best out of egg whites.
Weigh the granulated sugar and keep it close to your working area. Put the egg whites and the cream of tartar in the stainless steel bowl. Start beating them at medium-high speed with your mixer. Once the egg whites start to get bubbly and whiter, and the whisk begins lightly leaving marks (after a minute or two), add a tablespoon of the granulated sugar.
Continue beating and pour in the remaining sugar slowly over the next minute or two. The eggs will now be white and fluffy but not stiff enough. Continue beating at high speed until peaks form and remain up when you pull the whisk out. When the egg whites are ready, you’ll notice that they seem dense and creamy and not as “airy” anymore.
Here’s what the egg whites should look like at this stage:
STEP 4: ADDING COLOR (optional)
Set your electric appliances aside. From this stage on, the beaten egg whites—also called the meringue—must be treated gently.
If you wish to color the shells, now is the time to do so. Add a few drops of gel food coloring to the meringue and gently fold in the color using a silicone spatula: slide the spatula along the side of the bowl down to the bottom, then pull back up towards the center of the bowl. Do this 3 to 4 times to start distributing the color. The color will fully incorporate when you mix in the almond/sugar mixture. DO NOT whisk the meringue at any cost as it will deflate your egg whites and your batter will be ruined.
At this point, if you added food coloring, the color of your macaron batter should be at least as intense as you want the final macaron to be. The color will fade out a bit when you add the almonds/sugar mixture.
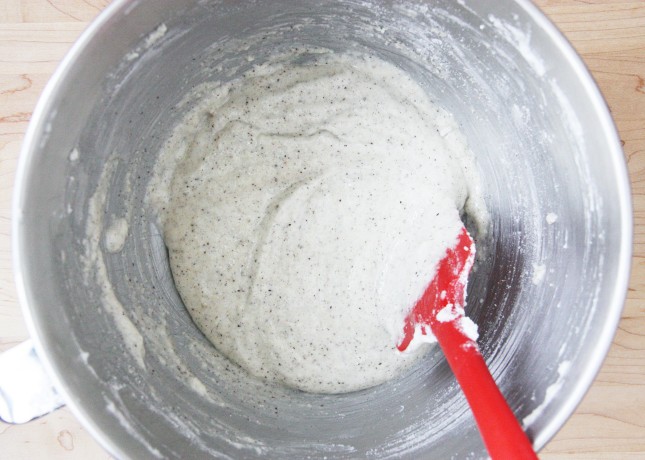
STEP 5: MACARONNAGE (incorporating the almond/sugar mixture into the meringue)
Pour about half of the sugar and almond mixture over the meringue and a silicone spatula to fold it in. Slide the spatula along the side of the bowl down to the bottom, then pull back up towards the center of the bowl. This will deflate the egg whites a little, which is normal. When the first half of the sugar and almond mixture is incorporated, add the rest of it to the bowl and keep on folding.
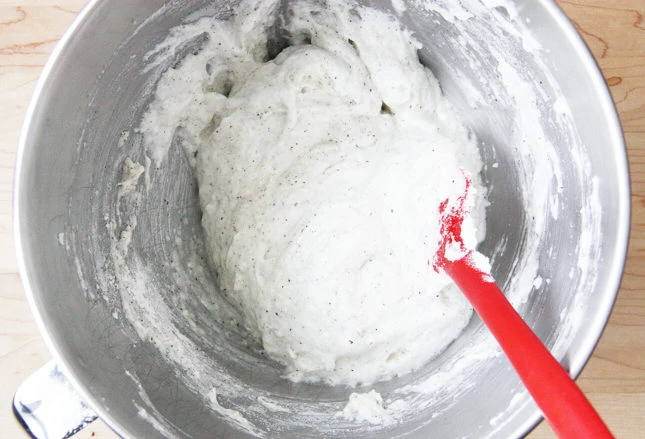
Now is when you need to start paying close attention.
At first, you’ll notice the macaron mixture looks curdled, and as you fold, it will become homogenous and looser. When ready, the macaron batter should be just loose enough for it to lazily drip from the spatula in a continuous ribbon.
Recognizing when the batter is ready is key to successfully making French macaron.
It’s important to learn to recognize when the batter is ready because the look of your finished shells depends on it. If you don’t fold enough and the batter is too stiff, the shells might not form feet. If you overfold and the batter is too loose, the shells will spread unevenly when you pipe them onto the sheet pans. They might also crack during the baking process.
When the macaron batter is evenly blended, it looks shiny, smooth, and creamy:
STEP 6: PREPARING THE BAKING SHEETS
Stack two baking sheets if you can (the extra layer helps macarons rise and cook more evenly). Cover the top baking sheet with a cut-out piece of parchment paper: the paper should fit flat over the bottom of the baking sheet and not come up the sides to avoid warping the macaron shells. Parchment paper sheets are very handy because they come in a pre-cut format that perfectly fits standard half sheets. I do not recommend using a silicone mat: their rubbery texture seems to cling to the delicate and somewhat sticky cookies so that you more often than not end up with empty shells (the tender insides remaining stuck to the mat).
Slide macaron templates under the parchment paper if you wish to use them.
STEP 7: PIPING THE MACARON SHELLS
Fit the pastry bag with its tip. I like to use disposable pastry bags that I wash and reuse 3-4 times before getting rid of them. Disposable plastic pastry bags are more flexible and easier to work with than textile bags. They won’t stain and they’re also really easy to clean just by letting hot water run through them.
To transfer the macaron batter to the pastry bag more easily, stand the pastry bag in a measuring cup. To do so, folding or twist the pastry tip to prevent the batter from flowing out, then fold down the top part of the bag (like a cuff) to make it easier to push the batter to the bottom of the bag.
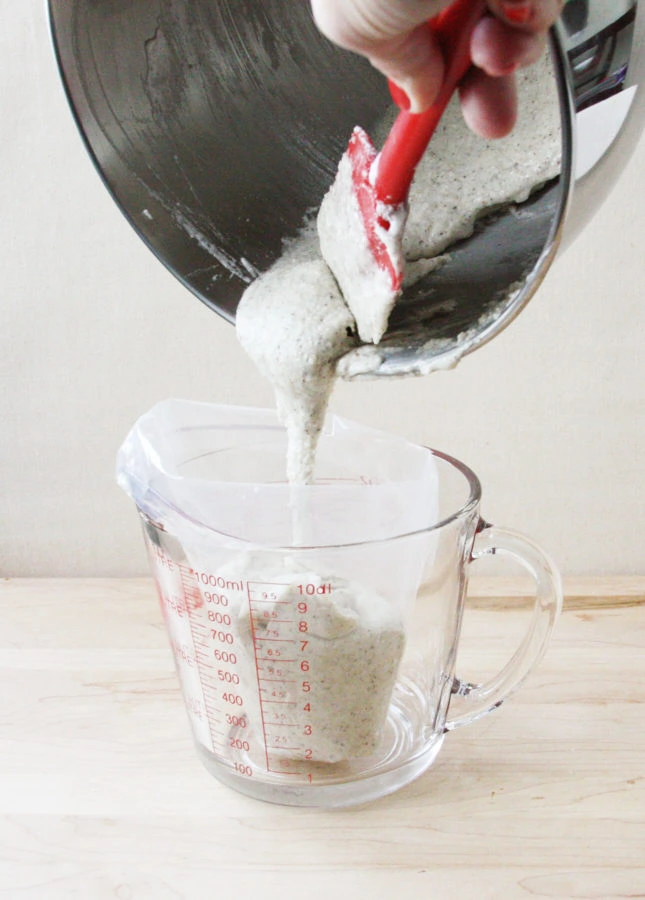
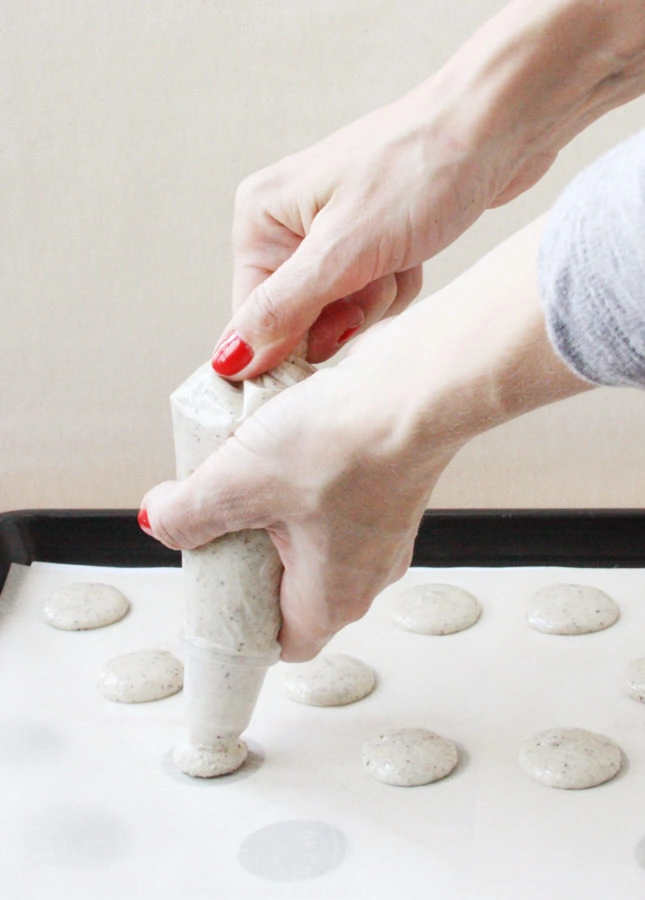
Transfer the macaron batter to the prepared pastry bag.
Take the pastry bag out of the cup, keeping the tip folded or twisted so that the batter doesn’t come out. Unfold the larger end of the bag and twist it shut close to the batter to push it down. As you pipe the macarons on the lined cooking sheets, you will continue this motion (twisting the larger end of the bag with one hand) to put constant pressure on the batter and ease its way out on the sheet.
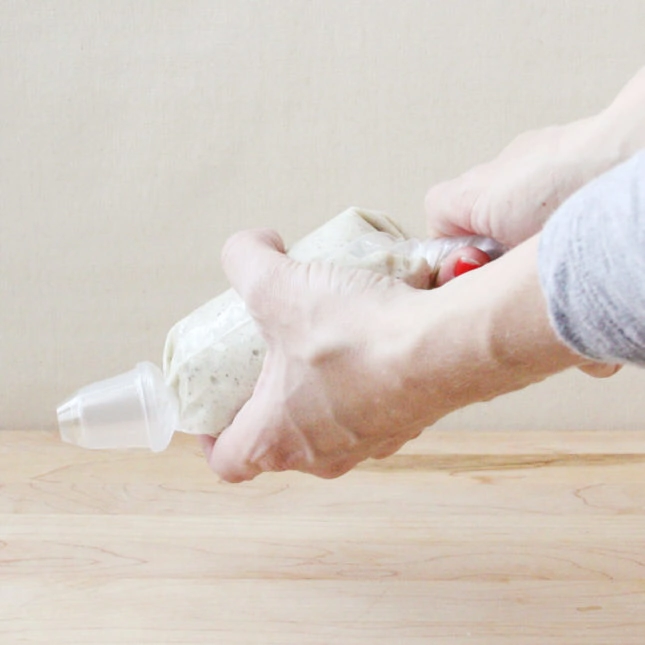
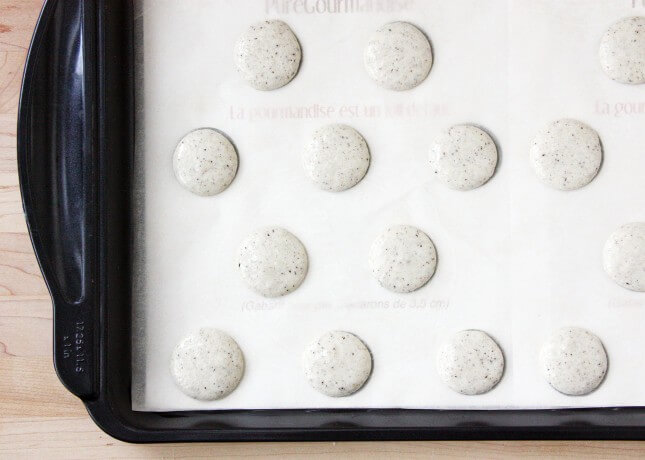
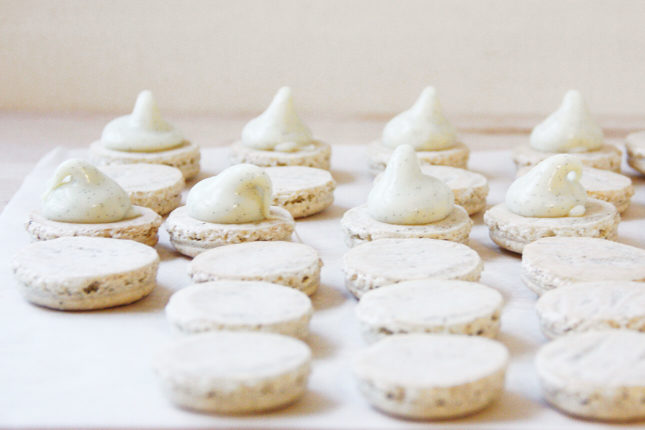
Here’s how to pipe perfectly round French macaron shells: Place one hand towards the tip of the pastry bag with one hand to guide it, and hold the larger end with your other hand to push the batter down. Keep the tip very close to the parchment paper, holding the bag upright, and twist the end of the bag so as to push the batter down and out to form 1 to 1.5” disks. You can set your macarons pretty close together as they won’t expand while cooking. When enough batter is out, stop twisting the end of the bag and swiftly lift the tip up to stop the batter from coming out. Finding the right rhythm to do this is tricky: you will need practice. Mastering this technique will ensure your macarons are uniform in size and round.
Right after piping, your French macarons may have a pointy tip that makes them look like lazy Hershey’s Kisses. Not to worry: as the macaron shells rest before cooking, they should smooth out. If they don’t, it may be a sign that your macaron batter is too stiff. There’s nothing you can do to change the texture of your macaron batter at this point, but you can smooth out the top of the shells: firmly bang each baking sheet on the countertop a few times. This will even out the caps and take the air bubbles out of them.
If there are still tiny points showing, you can use a small silicone spatula or an offset spatula to very gently smooth them out. This step is absolutely not mandatory; imperfection can be charming.
STEP 8: RESTING
The next step will test your patience: you need to let the piped, unbaked macarons rest at room temperature for at least 20 minutes. This step will “dry” the caps and help them rise properly later when they bake.
STEP 9: BAKING THE MACARON SHELLS
Halfway through the wait, preheat the oven between 275° and 300°F (135-150°C). Every single oven behaves differently, so I highly recommend the use of an internal oven thermometer to monitor the actual temperature of your oven. The temperature of some ovens can be off by as much as 25°F, which is enough to mess up a batch of macarons.
I have an electric oven and 275°F (135°C) is the temperature that generally works for me. This temperature can be too hot for light-colored macarons, which you don’t want to brown at all. In case of doubt, play it safe: bake the macarons at a lower temperature and leave them longer in the oven. To find out which temperature works best in your own oven, you will need to do a few tests and watch the macarons closely as they bake.
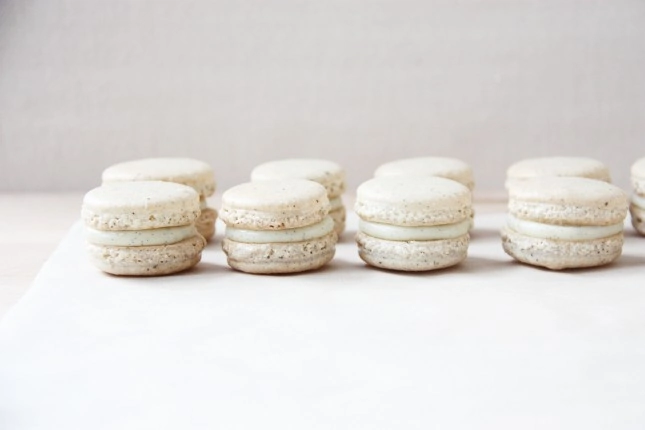
I baked the vanilla bean macarons, below, at 275°F (135°C) for 14 minutes. The average cooking time is between 13 and 18 minutes. From 12 minutes on, watch closely, and avoid opening the oven door before that. The macarons are ready when they look dry and matte and seem firm on their crown when you lightly tap on them.
Overbaking the macarons will make them too crunchy and brittle.
Underbaking them will give them a “wet” look as they cool. Underbaked macaron shells will also be difficult to remove from the parchment paper: they may stick to it and separate when you try to lift them off the sheets. Yes, it’s tricky!
After a few tries, you’ll get to know your oven and be better at figuring when your macarons are done. In any case, please play it safe when setting your oven temperature. Excessive heat is the macaron’s worst enemy: they will cook too quickly, cracking like meringue and browning, losing their beautiful color.
STEP 10: LETTING THE MACARON SHELLS COOL
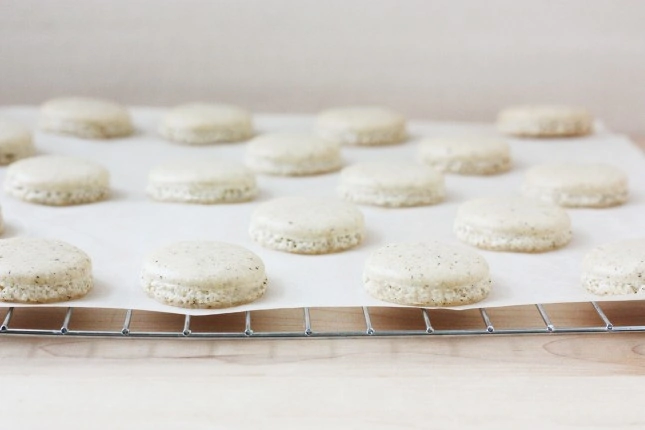
When the macaron shells are done, take the sheets out of the oven and let the shells cool completely over a wire rack.
If you need to reuse your baking sheets for the next batch, let the shells cool 5-10 minutes in the baking sheet, and then lift the parchment paper out of the sheet to set it directly on the cooling rack.
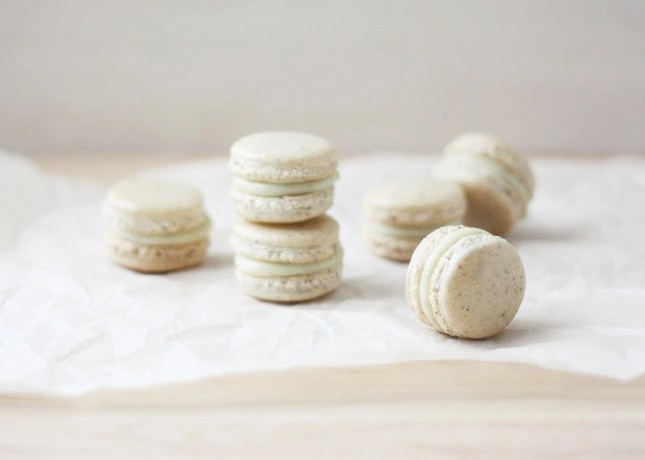
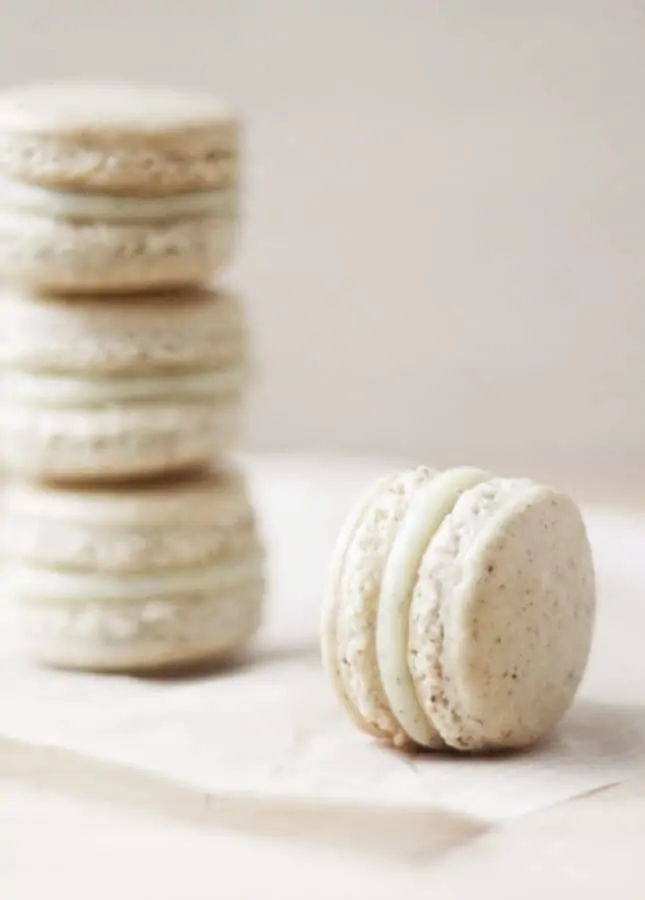
Once the shells have cooled to temperature, the French macarons are ready to be assembled.
STEP 11: ASSEMBLING THE FRENCH MACARONS
If you prepared the filling in advance, take it back out to room temperature at least 1 hour before assembling the macarons.
When French macaron shells are perfectly cooked and cooled, they should lift easily from the parchment paper, have a flat bottom and a beautiful puffy crown.
If your macaron shells seem to stick to the parchment paper, here are two tips to help lift them up without damaging them:
- Gently slide an offset spatula under each shell to lift them up;
- Stick the baking sheet in the freezer for 10 to 20 minutes. This will harden the shells just a bit, which should help them slide right off the sheet!
Match macarons shells that fit best together and set them side by side, flat side up, on the baking sheet or a clean working surface.
Transfer the filling to a pastry bag fitted with a large round tip. Alternatively, you can use an offset spatula to spread the filling on the shells.
Pipe frosting on one of each pair of macaron shells, or delicately hold one shell in one hand, flat side up, and spread some filling over it. Gently set the second shell over the filling and press lightly to help close the macarons.
STEP 12: THE WAITING GAME
Once all of the macarons are assembled, you need to put them in an airtight container, store them in the refrigerator, and let them rest for 24 hours, or at least overnight. That’s right! After all that hard work, you can’t even enjoy the macarons right away! Well, you can taste one just for a taste—macarons sure won’t be bad if you eat them right away. But resting French macarons with the filling in is the extra step that fully reveals their irresistible texture. The humidity of the filling then gets into the crunchy meringue caps, and that’s what creates the lovely contrast between the lightly crisp outer shell and the tender insides. Be patient, trust me, it’s worth the wait.
The good news about that extra wait is that it means French macarons can and should be made in advance. Your macarons will be at their best if you eat them within the next 2 to 3 days. Always make sure to bring them back to room temperature 30 minutes to 1 hour before serving.
STEP 13: ENJOY!
Enjoy the fruit of your labor, then plan your next batch, and keep practicing. Your macarons will only keep getting better!
Yes, French macarons are finicky. Yes, they require patience to make. Yes, you are likely to fail at first—I still mess up batches from time to time, even after 15 years of making them at home! But the challenge is worth taking on, and biting into your very first homemade macaron is so satisfying! There’s nothing quite like it. Plus, making French macarons at home is way less expensive than a plane ticket to Paris :)
Can You Freeze French Macarons?
Yes! French macarons withstand freezing very well. Store assembled macarons in an airtight container, then freeze for up to one month. Once the macarons are frozen, you can take out the exact quantity you need and keep the other at their freshest. To serve, simply let the macarons rest at room temperature for an hour and they’ll be ready to eat.
Note that freezing works better with creamy fillings such as buttercreams and ganaches. Fillings that are more humid, such as jams, can excessively moisten the shells, making them lose their crunch completely. If you plan on filling your macarons with jam, you’re better off freezing the shells alone, then defrost and assemble them on the day you plan to serve them.
Should I Throw Away Failed Macaron Shells?
NEVER throw away failed macaron shells. Your macarons shells may not always come out looking as perfect as you’d like them to be—they could be warped, cracked, or hollow, but unless they are downright burnt, they are still usable. Fill them and enjoy them, or give them away to friends and family who will be more than welcome to enjoy these treats, even if they look slightly wonky.
If you have trouble making macarons, make sure to read through my very detailed Macaron Troubleshooting Guide: Useful Tips and Advice to Master the French Delicacy. This post gathers ALL of the most frequently asked questions I’ve been asked about French macarons over the years.
Where to Find More French Macaron Recipes
My French macaron recipes are sure to inspire macaron lovers!
- Milk Chocolate Miso Macarons
- Hazelnut Pear Macarons
- Dark Chocolate Macarons
- Pistachio Macarons
- Milk Chocolate and Passion Fruit Macarons
- Lemon Mascarpone Macarons
- Salted Caramel Macarons
- Fresh Raspberry and Matcha Macarons
- Honey Orange Macarons
- Maple and Pecan Macarons
- Spiced Pecan Macarons with Caramelized Apple Buttercream
- Strawberry and Rhubarb Macarons
- Clementine Macarons
- Lime and Basil Macarons
- Chocolate-Chestnut Macarons
- Yuzu & Ginger Macarons
Printable French Macaron Template
PDF file: print two copies to fit a standard half-sheet pan. Download the printable French macaron template.
Printable Basic Recipe for French Macarons: Vanilla Bean Macarons
Basic Recipe for French Macarons: Vanilla Bean Macarons
Ingredients
For the vanilla bean buttercream
- 113 g unsalted butter, room temperature
- 240 g powdered sugar, sifted
- ½ vanilla bean, halved lengthwise, seeds scraped with the back of a knife (substitute 1 tsp/5 ml pure vanilla extract)
- 1 ml kosher salt, or fine sea salt (omit if using salted butter)
- 15 to 30 ml milk
For the vanilla macaron shells
- 3 large egg whites, separated two days in advance, stored in an open container in the fridge (about 3.5 oz/100 g)
- 210 g powdered sugar
- 125 g almond flour
- 5 ml pure vanilla powder (ground vanilla bean powder) (optional)
- 30 g granulated sugar
Instructions
- For the vanilla bean buttercream: In the bowl of a stand mixer fitted with the paddle attachment, or in a large bowl if using a hand mixer, beat the butter until smooth. Add the sifted powdered sugar and mix at low speed to moisten the sugar. Increase the speed to incorporate fully. Add the vanilla seeds and salt, then beat at high speed until the frosting is light and fluffy. If the frosting seems a bit stiff, add some milk, one tablespoon (15 ml) at a time, until you reach the desired consistency.
- If using right away, transfer to a pastry bag fitted with a large round tip. If you prepared the vanilla bean buttercream in advance, store in an airtight container and refrigerate until needed.
- For the vanilla macaron shells: *Return the egg whites to room temperature at least an hour before making the macaron shells.*
- In the bowl of a food processor, add the powdered sugar and almond flour, and process until the mixture is thoroughly incorporated, 30 seconds to a minute. Sift the mixture through a fine-mesh strainer to make sure no lumps or bigger bits of almonds are left.
- In the bowl of a stand mixer fitted with the whisk attachment, or in a large stainless steel mixing bowl if using a hand mixer, whisk the egg whites on medium/high speed until frothy. Add a tablespoon of the granulated sugar, continue whisking at medium-low speed, then add the remaining sugar slowly. Increase the speed medium-high and whisk until the egg whites are bright white and create stiff peaks.
- Add the almond and powdered sugar mixture to the egg whites and, using a spatula, gently fold in the dry ingredients: slide your spatula all the way to the bottom of the bowl and come back up to the top. Do this about 6 times to incorporate the dry ingredients, then keep folding for a total of about 14 strokes until no pockets of dry ingredients remain and the mixture drops from the side of the spatula in a slow, lazy ribbon. Start testing the ribbon stage early to avoid overfolding.
- Stack two baking sheets and line the top sheet with parchment paper. If you're not using parchment paper sheets, cut out the parchment paper so it fits precisely over the bottom of the sheet to make sure the macarons will lay flat. Slide macaron templates under the parchment paper, if using.
- Transfer the macaron batter to a pastry bag fitted with a ½-inch (1.25-cm) round tip. Pipe 1 ½-inch (3.8-cm) rounds of batter, evenly spaced but still close to one another as they will not expand much.
- Carefully slide the macaron templates off the baking sheets, if you used them. Let the shells rest on the baking sheets for 20 to 30 minutes.
- Preheat the oven to 275°F (135°C) with a rack set in the middle position. Bake each sheet of macaron shells for 15 to 18 minutes, or until the shells are firm on their feet when you lightly tap on them with the tip of a finger.
- Repeat the steps above to bake all the macaron shells.
- Let the shells cool completely to room temperature before assembling them, about an hour.
- To assemble the macarons: If you prepared the vanilla bean buttercream in advance, bring it back to room temperature at least 1 hour before using.
- Pair same-sized shells together and set them side by side on a work surface. Using a small offset spatula, spread some milk chocolate and passion fruit ganache over half of the shells. (If you refrigerated the ganache, let it warm back up to room temperature for at least 30 minutes, or until spreadable.) Close the macarons, gently pressing the second shells over the filling.
- STORAGE: Store the assembled vanilla bean macarons in an airtight container and refrigerate for one night before indulging. French macarons will keep, refrigerated, for up to 3 days. You can also freeze assembled macarons in an airtight container for up to 1 month.
- SERVING: Always bring these Passion Fruit French Macarons back to room temperature 30 minutes to 1 hour before serving.
Video
Did you make this?
Tell me how you liked it! Leave a comment or take a picture and tag it with @foodnouveau on Instagram.
Disclosure Notice: This site is a participant in the Amazon Associates Program, an affiliate advertising program designed to provide a means for the site to earn fees by linking to Amazon and affiliated sites.
If you click on an affiliate link, I may earn advertising or referral fees if you make a purchase through such links, at no extra cost to you. This helps me create new content for the blog–so thank you! Learn more about advertising on this site by reading my Disclosure Policy.
Author: Marie Asselin
Thanks for the recipe and the great directions. My macarons turned out really well on the first try. I had a problem with the food colouring. I wanted a pale baby blue so added a little blue food colouring and it turned almost turquiose, similar to a robins egge blue. Very pretty but no what I wanted. I wouls appreciate any help you could give me.
Thanks Teresa
Well, coloring the macarons is a matter of trial and error. Try buying a larger set of food coloring that provides more shades of blue – you’d certainly find one that’s closer to what you’re looking for.
Hey Maria,
I use a microwave oven which can accomadate only very few macaroons at a time so will the rest of the mix be damaged if kept ouside ,is it better to keep the mix as such or pipe it and let it rest while the other ones are in the oven?
You can leave the macaron batter at room temperature for about an hour while you’re baking the shells, one batch at a time. If it’s especially warm or humid though, I would place the remaining batter (the portion that hasn’t been piped out yet) in the fridge in between each piping session.
Hey, can I reduce the amount of sugar used in making these macaroons? As my parents could'nt eat something that are too sweet. Will there be too sweet if follow with the exactly amount of sugar? Will try this recipe soon..thanks for sharing and reply. =)
You can’t reduce the amount of sugar used in the macaron recipe. The ratio is essential to make the meringue necessary to achieve a great macaron. Check out this troubleshooting entry for more info about the use of sugar in macarons.
my first batch didn't turn out. I'm not sure why some of them cracked at the top and when I took them out because the crown was hard they were undercooked and won't come off the paper at all. I left them to "dry out" longer than 20 minutes. Does that change the texture? my oven was at 250 because it can get quite hot and I tried following the recommendation of cooking it longer at a lower temp. my rack was in the middle – should I move it up? What did i do wrong-what happened? Otherwise I think your blog is awesome! Thanks!
Baking the shells in the middle of the oven is fine. Check out this troubleshooting series of posts to find out what went wrong with your shells.
Hi i made a similar recipe but made a white choc and mixed berry ganache. yum yum. I seem to have problems with my shells cracking half will be ok the other half gone. plus dont seem to get the "feet" properley. any suggestions?
I used the same technique as the one described above
Check out this troubleshooting entry for more info about feet.
I am thinking of making these for my wedding favours. I will need to make 220 as we have roughly 110 guests and I want to put 2 in each. How long do you think this will take? I only have a couple of days to put aside to make them. I will have a back up just in case they dont work but I wanted to put a bit of a personal touch on our wedding favours.
I will be making them a week before the wedding so they will go in the freezer but they will need to be taken to the venue the day before the wedding and put in the fridge. Until they are ready to put them out in the afternoon before the guests arrive at the reception. Will the make them go bad at all? Do you have any other tips for this.
I wanted to make coral/salmond coloured macaroons (as our wedding is mainly balck and ivory with the girls dresses and a few flowers being coral/salmon colour) with a white chocolate filling.
Do you think this is over reaching.. trying to make this many in a couple of days.. I will have help from my mum putting them together etc..
Thanks
Read this troubleshooting entry for more info about how long it takes to make macarons.
Taking macarons out of the freezer and into the fridge one day ahead is perfectly fine.
This is a great recipe! My first batch came out okay, but I think I just let them over dry, but my second batch was pure perfection thanks to you! BTW I did use cold egg whites and it didn't make a difference since they were still aged. Thanks!
mind if i asked you? how many days did u let the eggs age?
1 to 2 days in an airtight container in the fridge. Details here.
Hello, I never really made these before so I was wondering, how exactly do you make the fillings for the macaroons?
Sky’s the limit! Check out this list of recipes for inspiration.
Any recommendations for baking in a convection oven – there is not the option of no fan – but I tried with the fan on low and they tasted great, but the "feet" appeared to spread out – my thought was that it was due to the fan.
Try to lower the temperature to a minimum – convection speeds up the heating process, so a cooler oven should work better.
Hi there
Thank you for this great guide! love how detailed it is..and the video is very helpful too.
I just have a question regarding the tip for the pastry bag. I can't find Ateco tips here so I bought a Wilton 2A. Can you please tell me if that size is okay? Thanks a lot!
Sharon
Yes, the Wilton 2A tip is fine. Happy the post and video were helpful.
Hi! Thanks so much for these instructions. I have only made two batches and I have a few problems. First time I made them too big and likely did not cook them long enough but they were edible. This last time I used powder colorant and it was difficult to mix in gently. The shells rose a bit and had little "feet" but they were sticky underneath and hard to get off the parchment paper. Again, edible but not perfect macarons.
I cooked them at 148 C but I think my oven cooks a bit lower than the stated temp. They were still a little big but I think my batter might be a bit thin. I only let them sit for about 20 minutes before cooking and they did not rise very much. My first batch I let sit for an hour (per Tartlette) and they rose well and had nice feet but again I think I did not cook them long enough.
Any tips on getting a great final result?
Thanks!
Please read through my Macaron Troubleshooting post for additional tips that should help you make macarons successfully.