- V
- GF
- NS
- DF
- View Recipe Key
How to Make Classic Cream Puffs
How to Make Classic Cream Puffs

Learn how to make classic cream puffs by combining crispy choux pastry, a creamy vanilla filling, and a rich chocolate glaze. Perfect for any occasion!

This post contains affiliate links. Full disclosure is at the bottom of the article.
Let’s talk about classic cream puffs. They’re the kind of dessert that feels a little fancy, like they’ve been plucked out of a Parisian pastry shop. But here’s the thing: making cream puffs at home is less intimidating than you might think. Sure, there’s a bit of technique involved, but once you break it down and spread the preparation of the different components over a couple of days, it’s more about having fun and embracing the process than stressing over perfection.
Classic cream puffs are all about balance between the light and crispy choux pastry, creamy vanilla custard, fluffy Chantilly cream, and silky dark chocolate glaze. No gimmicks, no frills—just the classic combination that has made cream puffs a staple of French pastry for centuries.

At the heart of the cream puff is choux pastry (pronounced “shoo”), a dough that’s as fun to make as it is to say. Choux pastry isn’t your average pastry dough: it’s cooked on the stovetop before it ever sees the oven. It’s a quirky little step, but it’s what gives the dough its signature puff. When baked, the high moisture content creates steam, causing the pastry to rise and hollow out into perfect little golden shells that are just begging to be filled. It’s science, but the delicious kind.
CHOUX PASTRY VIDEO MASTERCLASS
Never made pâte à choux before? In my detailed video class, you will learn how to make pâte à choux, and then discover how to turn this one dough into chouquettes, cream puffs, profiteroles, éclairs, and gougères, or savory cheese puffs. Along the way, I’ll provide helpful tips to help you be successful on your first try, and demonstrate many variation ideas. My fun class will quickly allow you to master a new skill, that will in turn allow to create impressive puffed treats. Watch now!
The beauty of choux pastry is that it’s a blank canvas. You can use it to make cream puffs and éclairs, but also savory treats such as gougères (cheese puffs!). Once you’ve mastered making choux pastry—which is guaranteed to happen quicker than you think!—the pastry sky’s the limit! You’ll quickly find yourself whipping up a batch as soon as a craving strikes.
Classic cream puffs are filled with two elements: pastry cream and Chantilly cream. Pastry cream is creamy, smooth, with just the right level of sweetness and a touch of vanilla flavor. Making pastry cream requires a bit of whisking and patience, but there’s something soothing about watching it thicken into a rich custard. The reward? A filling so good, you’ll be tempted to eat it straight from the bowl (no judgment here).
Chantilly cream is “sort of” just a fancy name for whipped cream. The difference between Chantilly and whipped cream is that the former is sweeter and flavored with vanilla. In classic cream puffs, Chantilly cream fill up the bulk of the cream puff shells, adding a fluffy touch to the creamy pastry cream base. I like to go over the top and pipe extra Chantilly cream, so it comes all the way out of the shells. This makes the cream puffs extra beautiful and appealing.
Let’s not forget the chocolate glaze—the finishing touch that ties everything together. To make the glaze, you simply melt dark chocolate into heavy cream. This creates a glossy and rich ganache, the perfect counterpart to the light pastry and creamy filling. Dipping the tops of the puffs in chocolate is one of the most satisfying parts of the process, like adding a final brushstroke to a masterpiece.

This Classic Cream Puffs recipe sticks to the classics for a reason. There’s something timeless about the combination of crisp pastry, creamy filling, and chocolate glaze that doesn’t need to be reinvented. It’s the kind of dessert that works for any occasion: a dinner party showstopper, a tea-time treat, or even just a little something special to make your Tuesday feel fancy.
Making cream puffs is as much about the journey as it is about the result.I’ll be honest—cream puffs aren’t entirely foolproof. You’ll need to pay attention to a few details, like cooking the dough just right and keeping an eye on the oven while they bake. But don’t let that scare you off. The steps are straightforward, and once you get the hang of it, you’ll feel like a pro.
So whether you’re in the mood to tackle a classic French recipe or just want an excuse to treat yourself to something delicious, give these cream puffs a try. They’re the kind of dessert that will make you feel accomplished and they’re a guaranteed crowd-pleaser—even if the crowd is just you standing over the sink, eating a cream puff straight out of the fridge.
Questions and Answers About Making Classic Cream Puffs
What is choux pastry, and why is it unique?
Choux pastry is a cooked dough that uses steam to rise, creating hollow shells perfect for filling. Its unique texture comes from the high moisture content and the combination of cooking and baking.
Why is it important to cook the flour mixture before adding eggs?
Cooking the flour mixture helps thicken it and remove excess moisture, which creates the structure needed to trap steam during baking. This steaming creates that signature hollow center, which you can then fill with delicious creams.
How do I know when the choux pastry is ready?
The dough is ready when it’s smooth, thick, and elastic. You’ll see it pull away from the sides of your saucepan, leaving a thin film behind.
Why do I need to let the choux pastry cool before adding eggs?
Adding eggs to hot dough can cook them prematurely, resulting in an uneven dough. Cooling slightly ensures a smooth mixture.
Can I make the choux pastry ahead of time?
Yes, you can make choux pastry and refrigerate it for up to a half-day before baking. Once the pastry is done, I transfer it straight to a piping bag so it’s all set and ready to pipe out the shells. You can pipe the choux pastry directly from the fridge, then bake as indicated in the recipe.
What size should classic cream puffs be?
Classic cream puffs are generously sized and can be eaten in 2 to 3 (messy) bites. Of course, you can create smaller, one-bite cream puffs: simply decrease the baking time accordingly.
How to portion cream puffs more quickly (and create uniformly sized cream puffs)
My favorite hack to create perfectly sized cream puffs in a snap is to use a cookie scoop. This tool allows you to control the amount of dough you use easily and quickly creates cream puffs that are precisely the same size.
This recipe for Classic Cream Puffs uses a medium ¾ oz (1 ½ tbsp) cookie scoop.
What is choux craquelin, and why is it useful?
Choux craquelin is a simple dough made of butter, brown sugar, and flour. This dough is then rolled thin and cut out into rounds, which are placed over the cream puffs just before baking.
Essentially, craquelin helps create rounder, more uniformly shaped cream puffs. It works because the butter in the mixture melts and “fries” the top of the puffs, which controls the development of the puffs during baking. This creates perfectly round cream puffs.

Do I really need to use craquelin to make classic cream puffs?
No, you don’t. Though making craquelin isn’t difficult at all, it is the kind of “next-level” technique you can skip over if this is your first time making cream puffs or if you don’t mind if your cream puffs are perfectly imperfect.
The difference between cream puffs made without craquelin (left) and with craquelin (right).
Why must choux craquelin be frozen?
Quite simply, craquelin dough is very soft and difficult to handle at room temperature. Freezing craquelin also slows down its melting process during baking, allowing the cream puffs to bake to their beautiful potential.
How to know when cream puffs are baked through
Cream puffs are baked through and ready to come out of the oven when they’re dark golden brown all around—that is, down to the bottom of the puff. This tends to take longer than you might expect; cream puffs might look perfectly puffed and golden after 20 minutes; but if the base is still blonde when you pull the puffs out of the oven, they will likely collapse while cooling instead of retaining their beautiful round shape.
Can cream puffs be made in advance?
Classic cream puffs that have been filled should be enjoyed within two hours. Past that, the pastry shell will start absorbing some humidity from the fillings, which means you’ll slowly but surely lose that irresistible contrast between the crispy shells and the creamy center.
However, most of the classic cream puff components can be prepared in advance; the cream puff shells can even be frozen! This means you will only need to do the final assembly shortly before serving. This spreads the work over time, making the project more approachable. If one of the components doesn’t work exactly how you expected it to, you won’t feel like you’ve spoiled tonight’s dessert! You can simply start over and get everything ready before the big day.
The Chantilly cream is the only component you should be making just before filling the classic cream puffs. This will ensure the fluffiest texture.
But! You can also make “stabilized” whipped cream, which allows you to prepare it up to 2 days in advance. Making stabilized whipped cream couldn’t be easier: simply add 1/3 cup (80 g) mascarpone cheese to the mix. More details about this simple technique below.

What is Stabilized Whipped Cream and how can I make it?
“Stabilized” whipped cream is whipped cream prepared with an added stabilizing ingredient to help it hold its shape for a longer period of time. Regular whipped cream can deflate or “weep” (release liquid) after a while, but stabilized whipped cream maintains its fluffy texture and structure, making it ideal for piping, decorating, or using in desserts that require longevity—such as my Classic Cream Puffs.
There are many ingredients you can use to stabilize whipped cream. Pastry chefs most often use gelatin, but this ingredient is a bit more complicated, and most home cooks do not have gelatin on hand.
Over time, I’ve discovered that the easiest way to stabilize whipped cream is to incorporate a small quantity of mascarpone cheese. Mascarpone is a creamy Italian cheese with a milky flavor that perfectly blends into whipped cream. You could also use cream cheese, but I find its tangy flavor can be noticeable in Chantilly cream.
Making stabilized whipped cream couldn’t be easier: simply add 1/3 cup (80 g) mascarpone cheese to the bowl with the heavy cream, sugar, and vanilla extract. Whip everything together, and you’re done!
Stabilized Chantilly cream can be refrigerated in an airtight container for up to 2 days. You can use stabilized whipped cream to pipe over cakes and cupcakes, top pies and tarts, or fill éclairs and cream puffs.
Can cream puffs be frozen?
Both craquelin and cream puff shells can be frozen.
Preparing craquelin in advance means you’ll save some time baking the shells. Cut-out rounds of craquelin can be kept frozen for up to one month.
The baked cream puff shells can also be frozen for up to 1 month. Bake the shells as indicated, then let them cool to room temperature. Place all the cream puff shells on a baking sheet, then place the sheet in the freezer for at least 3 hours or overnight.
Once the shells are frozen hard, gently transfer them to an airtight container (the frozen shells are very fragile and can break easily if they’re not handled with care.) You can keep cream puff shells frozen for up to 1 month.

How to return frozen cream puff shells to their freshly baked glory
Thawed cream puff shells will be soft and sad. To return them to their freshly baked flavor and texture, preheat the oven to 325°F (160°C). Place the cream puff shells on a baking sheet. Bake for 7 minutes, then transfer to a wire rack and let cool completely to room temperature. (This will return the cream puff shells to their crisp, freshly baked state.) Proceed with filling the cream puffs as indicated in the recipe below.

Preparation plan for making Classic Cream Puffs
SAVE A PDF COPY / PRINT THIS PREP PLAN
Up to 1 month in advance:
- Make the choux craquelin, and freeze it.
- You can also bake the cream puff shells and freeze them for up to 1 month. Refer to the recipe below for detailed freezing tips.
Up to 2 days in advance:
- Make the pastry cream filling.
- Make the stabilized Chantilly cream.
Morning of:
- If you haven’t made it in advance, make the choux pastry.
- Bake the shells and cool completely.
Up to 2 hours before serving:
- Whip the Chantilly cream (if you didn’t make the stabilized version.)
- Make the dark chocolate glaze.
- Fill the cream puffs a third of the way up with pastry cream, then generously garnish with Chantilly cream.
- Dip the tops of the cream puffs in the dark chocolate glaze.
- Transfer the cream puffs to a cool spot and keep at room temperature until serving.
Enjoy!


Classic French Cream Puffs Recipe
Ingredients
For the Pastry Cream
- ⅔ cup granulated sugar, divided
- 3 tbsp all-purpose flour
- 2 tbsp cornstarch
- 4 large egg yolks
- 1 cup milk
- 1 small vanilla bean, or 1 tsp (5 ml) pure vanilla extract
For the Choux Craquelin
- ¼ cup unsalted butter, room temperature
- ¼ cup brown sugar, packed
- ½ cup all-purpose flour
For the Chantilly Cream
- 1 cup heavy cream (35 % m.f.)
- ½ cup powdered sugar, sifted
- 1 tsp pure vanilla extract
- ⅓ cup mascarpone, cold from the fridge (OPTIONAL, to stabilize the Chantilly cream, see note)
For the Choux Pastry
- ½ cup milk
- ½ cup water
- ½ cup unsalted butter (1 stick), cut into cubes
- ½ tsp kosher salt, or fine sea salt
- 1 cup all-purpose flour
- 4 large eggs
Instructions
For the Pastry Cream
- In the bowl of a stand mixer, or to a large mixing bowl if using a hand mixer, beat together ⅓ cup (70 g) of the sugar with the flour, cornstarch, and egg yolks until thick and pale yellow, about two minutes.
- In a medium saucepan, combine the milk with the remaining sugar (⅓ cup / 70 g), and bring to a simmer. When the mixture simmers, remove it from the heat. Ladle 1 cup (250 ml) of the milk mixture into a glass measuring cup.
- Gradually pour the hot milk mixture into the egg mixture, mixing on low speed or stirring to combine. This will temper the egg mixture, ensuring it will not curdle when you pour it back into the saucepan.
- Scrape the tempered egg mixture into the saucepan, whisking constantly. Put the saucepan back on medium-low heat and cook, whisking constantly and scraping the bottom and corners of the pan from time to time to prevent the pastry cream from sticking or scorching.
- Keep on whisking until the mixture thickens and begins to bubble. Pay close attention because the thickening tends to happen quite quickly. Lift your attention for a moment and your pastry cream could curdle or burn!You may feel thickening suddenly happening in one corner of the pan. Once you do, to keep better control over the process, lift the pan from the heat and whisk vigorously (off the heat) to allow the cream to cook evenly. Put it back on the heat and keep cooking, whisking constantly, until the pastry cream is thick like pudding.
- Pour the pastry cream into a glass container and push a piece of plastic wrap or parchment paper right onto the surface to prevent a skin from forming over the pastry cream. Refrigerate to cool the pastry cream completely. You can keep the pastry cream refrigerated for up to 3 days.
For the Choux Craquelin
- In a medium bowl, beat together the soft butter and brown sugar until fully incorporated. Add the flour and beat just to incorporate. The craquelin dough should have a sticky Play-Doh texture.
- Bring the craquelin dough together into a rough ball. Set over a sheet of parchment paper. Cover with a second sheet of parchment paper. Roughly flatten the dough using the palm of your hand, then use a rolling pin to roll out to a ⅛-in (3 mm) thickness.
- Peel the top sheet of parchment paper off, then use a 1½-in (4 cm) round cookie cutter to indent rounds into the dough (do not try to lift the craquelin rounds at this point.) Transfer the sheet of craquelin dough into the freezer and freeze for at least 1 hour, or up to 2 days.
- TIME SAVING TIP: Once the craquelin dough is frozen hard, you can lift the frozen craquelin rounds (use the cookie cutter to fully detach the rounds, if needed) and store them in an airtight container. Separate each layer of craquelin rounds with parchment paper to avoid sticking. The craquelin dough warm up and softens very quickly at room temperature, so you might need to return the dough to the freezer a few times to lift all craquelin rounds. Discard the scraps. Keep the craquelin rounds frozen until needed.
For the Chantilly Cream
- In the bowl of a stand mixer, or in a large mixing bowl if using a hand mixer, add the heavy cream, powdered sugar, vanilla extract, and mascarpone, if using. Beat until stiff. Transfer to a pastry bag fitted with the pastry tip of your choice and refrigerate until ready to use.
- If the Chantilly Cream IS NOT stabilized: Use within 2 hours.
- Is the Chantilly Cream IS stabilized: Keep refrigerated for up to 2 days.
For the Choux Pastry
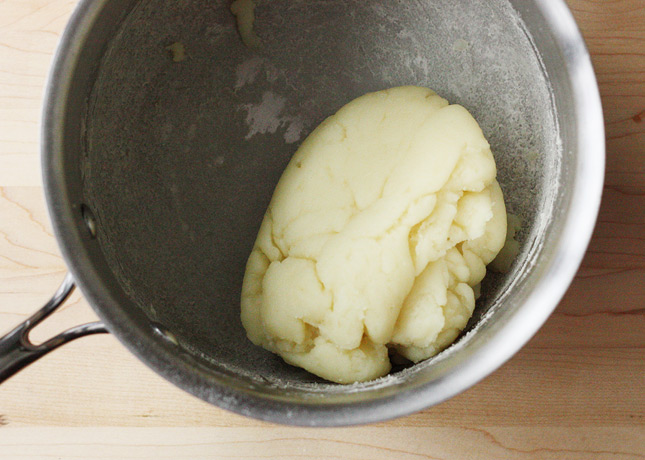
- In a medium saucepan, combine the milk, water, butter, and salt. Bring to a boil over medium heat. When the mixture is boiling, add the flour all at once and stir vigorously with a wooden spoon until the mixture pulls away from the sides of the pan. Keep cooking and stirring the mixture over medium heat for about 1 minute to eliminate excess moisture. If you used a stainless-steel saucepan, a thin layer of dough may stick to the bottom and sides of the pan; this is normal. Take off the heat.
- Transfer the dough to the bowl of a stand mixer, or to a large mixing bowl if using a hand mixer, and let cool for 5 minutes, stirring occasionally to allow some of the steam to come out.
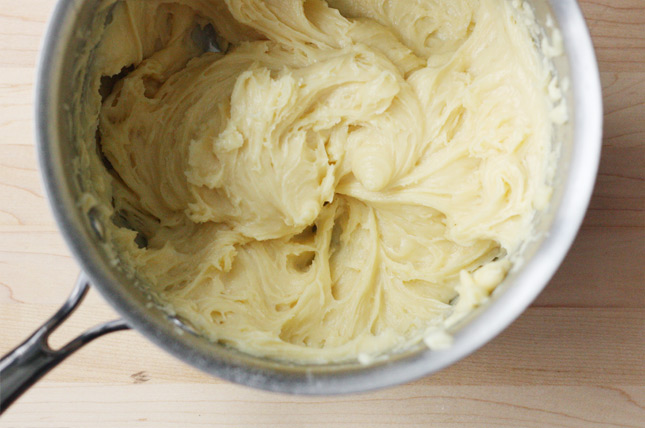
- Set the mixer to medium speed, and beat the eggs in one at a time, making sure each egg is well incorporated before adding the next. Scrape down the bowl down between each addition. Every time you add an egg, the dough will separate and look curdled, but it will then come back together in a super sticky, crumbly way. The dough will keep on getting smoother as you add more eggs. The dough is done when it is very thick and stick, but also smooth and elastic.
- Choux pastry can be covered and refrigerated for up to 6 hours (half a day.) You do not need to bring choux pastry back to room temperature before baking.
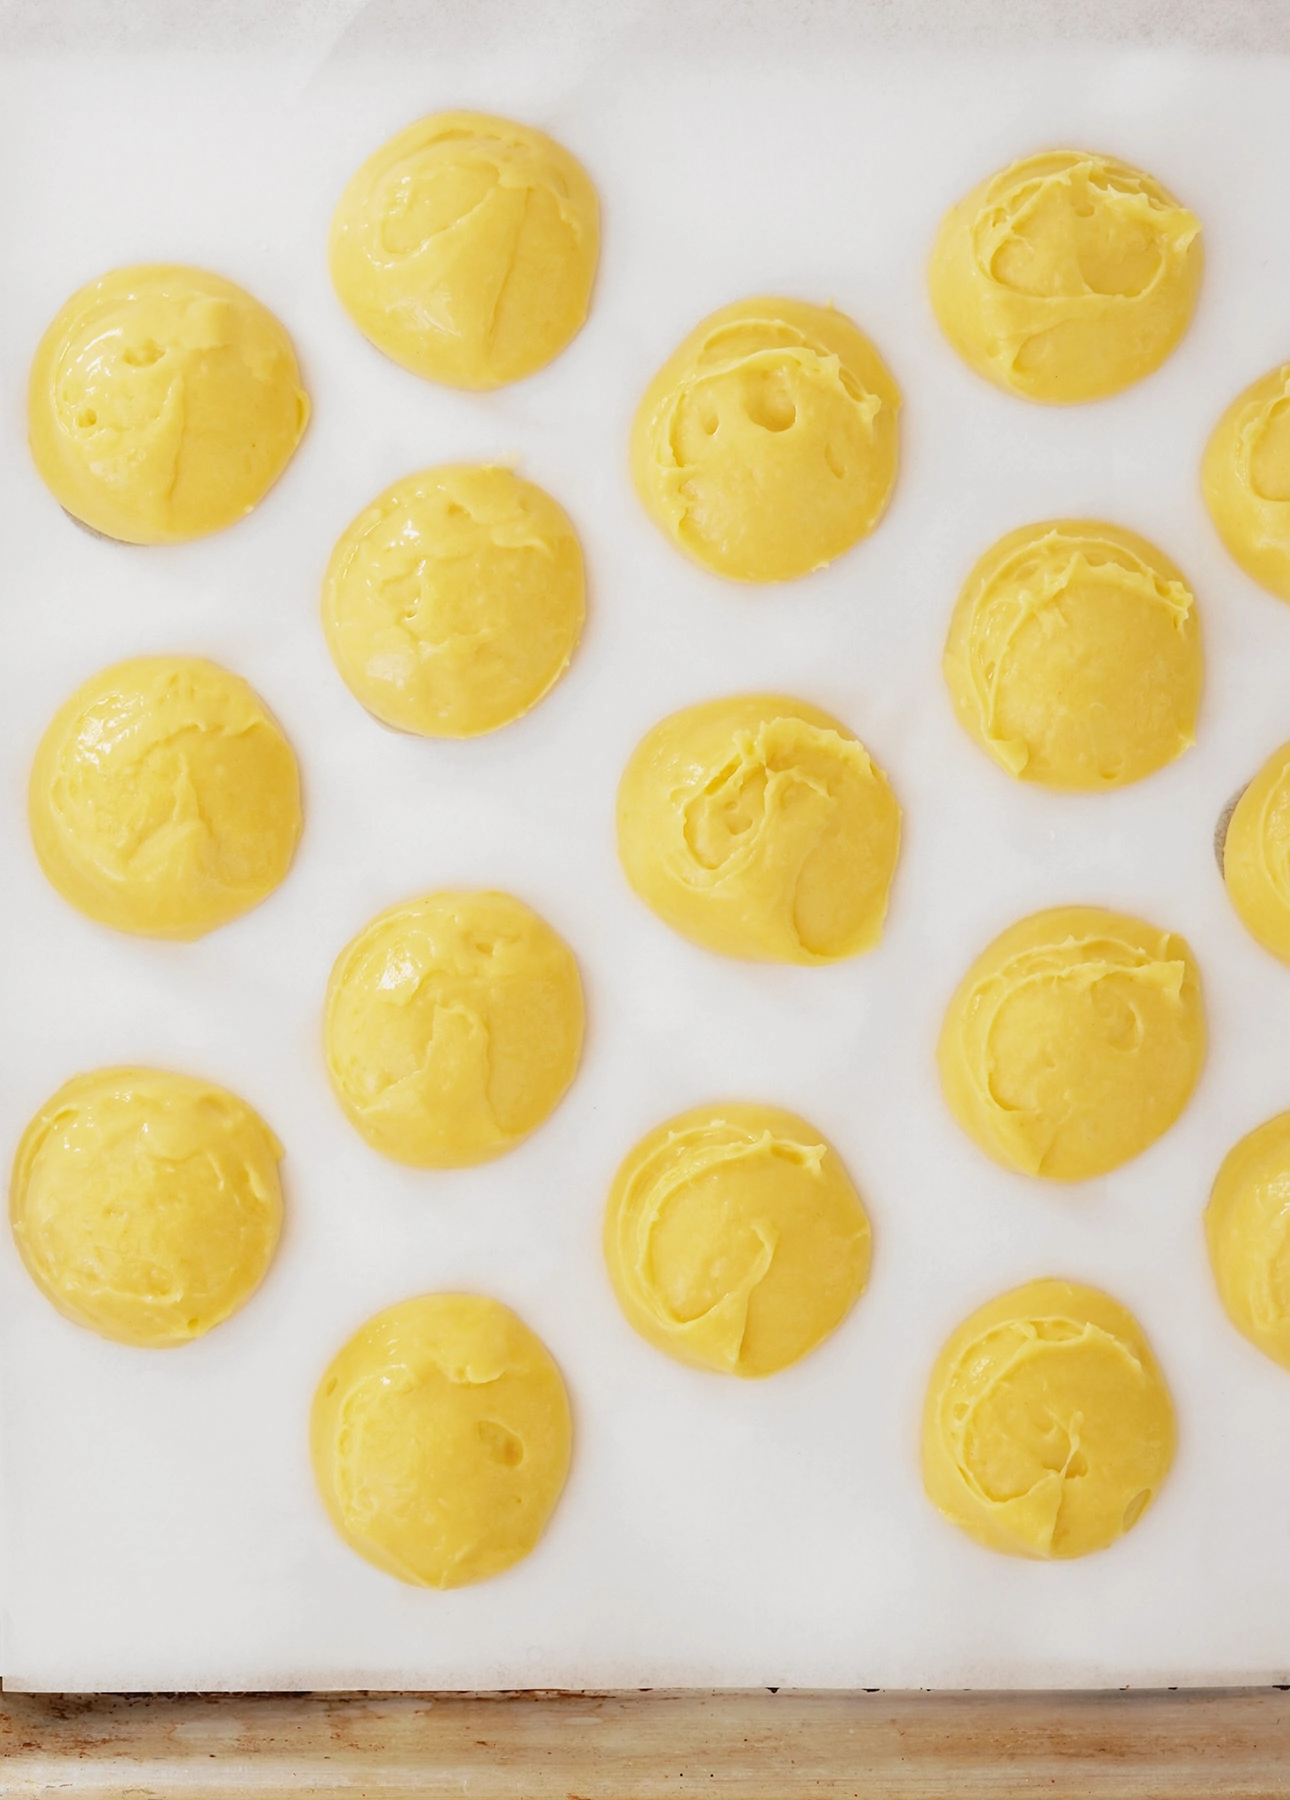
- To shape the cream puffs: Line a baking sheet with parchment paper.
- If using a cookie scoop to shape the cream puffs: Fill a ¾ oz (1 ½ tbsp) cookie scoop scant with choux pastry, then wipe excess pastry off the sides of scoop (this will create cleaner mounds of dough.) Drop the ball of choux pastry on the prepared baking sheet. Repeat these steps, setting the puffs 3 inches (8 cm) apart to leave plenty of room for expansion. You should be able to fit about 10 cream puffs on a standard half-sheet pan. (Refrigerate the remaining choux pastry between batches.) Using damp fingertips, press down any peaks of dough to create round puffs.
- If using a piping bag to shape the cream puffs: Fit a large piping bag with a size 6 (Ateco 806) round pastry tip. (The opening should be ½-in / 1¼ cm.) Fold the top 3 inches (7 cm) of the piping bag down over itself like a cuff. Using a spatula, scoop and push the choux pastry into the bag. Unfold the cuff and squeeze the bag to push the choux paste toward the tip. Firmly twist the top part of the bag to push the choux pastry down into the tip.
- Hold the bag with the tip perpendicular to the baking sheet. With the tip of the bag touching the sheet, squeeze gently and evenly with one hand, while guiding the tip of the bag with the other. Pipe out mounts of dough about the size of a ping pong ball (1 ½-in / 4 cm). You should be able to fit about 10 cream puffs on a standard half-sheet pan. (Refrigerate the remaining choux pastry between batches.) Using damp fingertips, press down any peaks of dough to create round puffs.
- To bake the cream puffs: Place a rack in the middle position of the oven. Preheat the oven to 400°F (200°C).
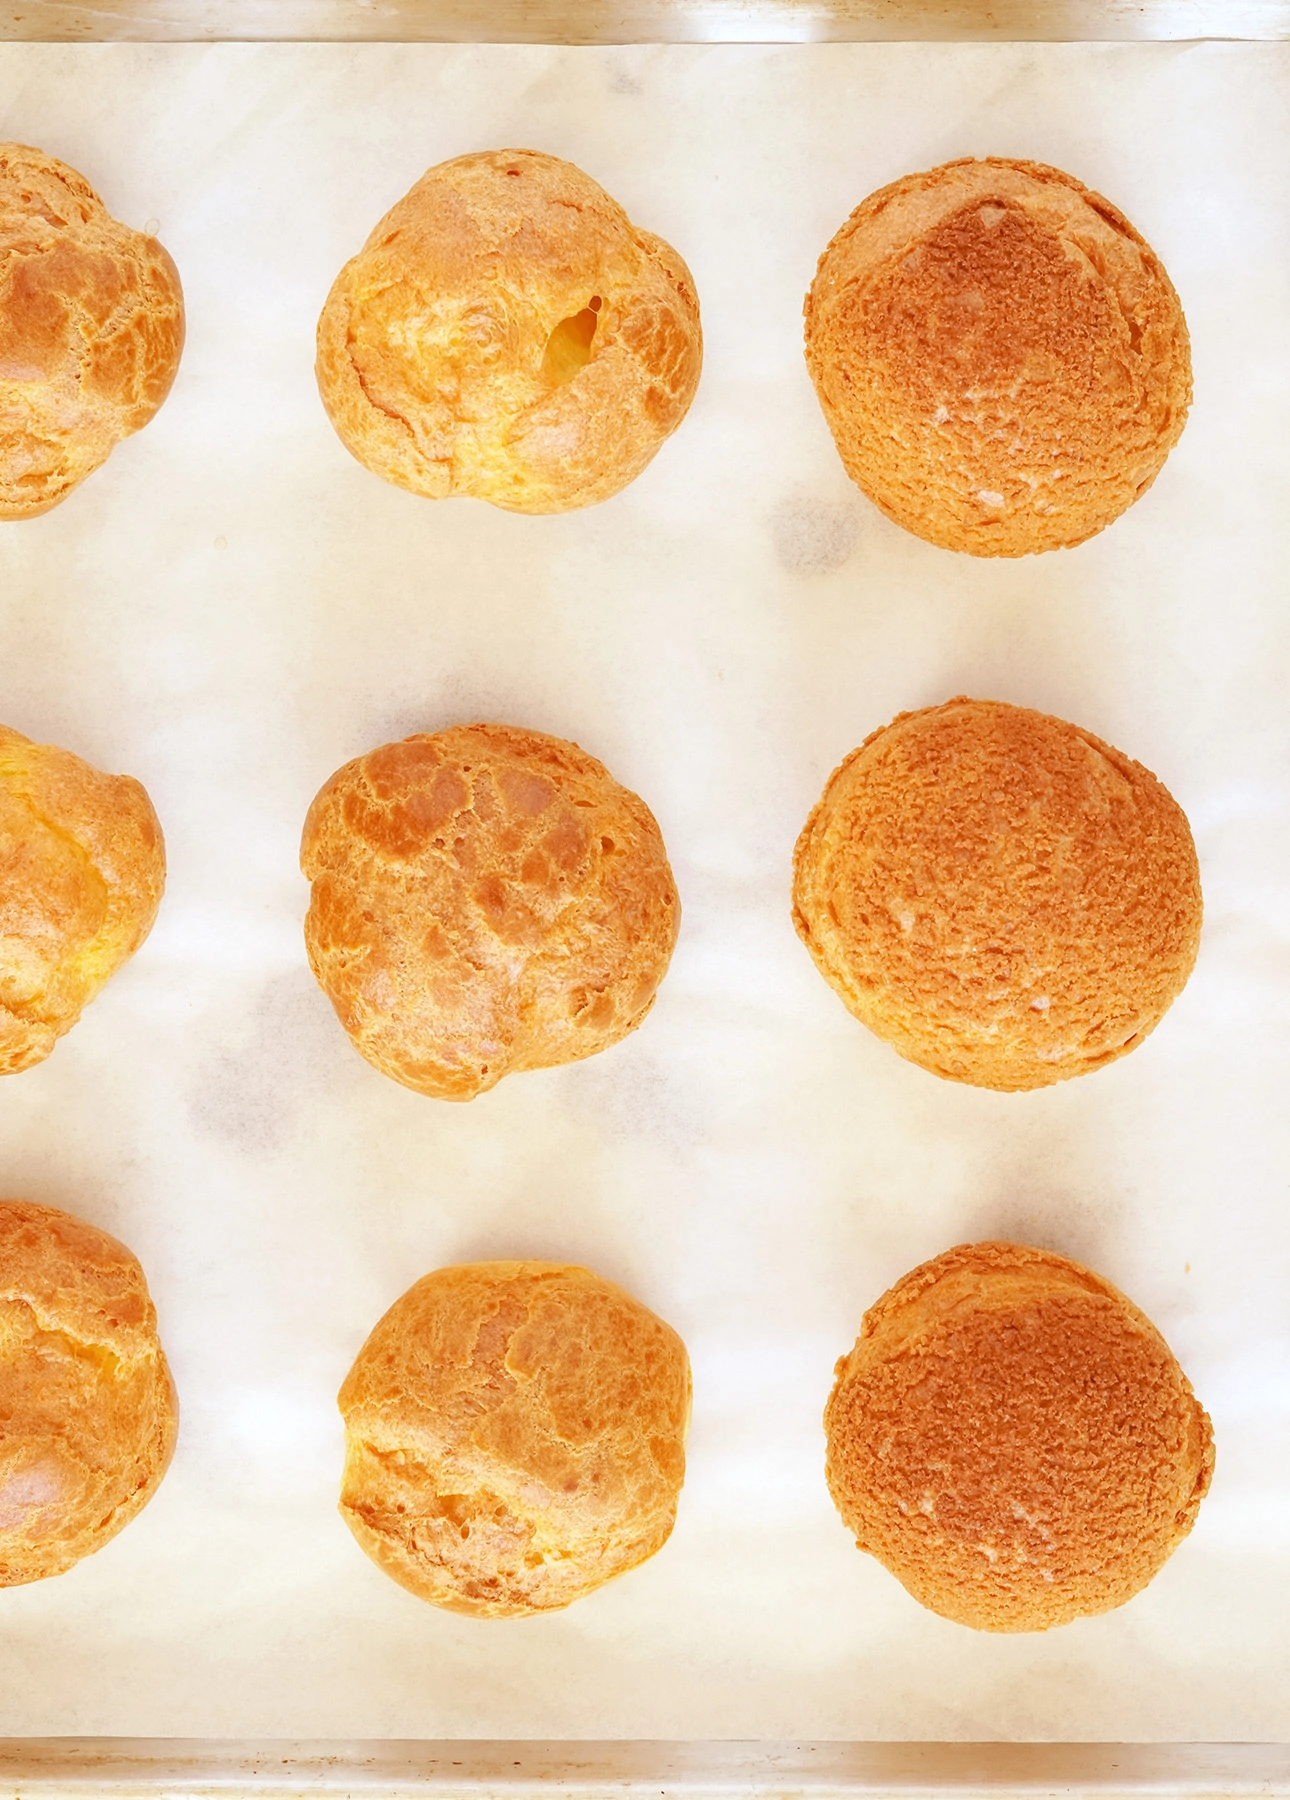
- If using, cover each cream puff with a craquelin round. Bake one sheet of cream puffs for about 30 minutes, or until the cream puffs are golden brown all around (if the puffs are light blond at the base, the puffs will collapse upon cooling.) Transfer the baking sheet to a wire rack and leave to cool completely to room temperature, at least 1 hour.
- Repeat the baking steps to prepare all cream puffs. If you have only one baking sheet, you can pull the parchment paper sheet out of the sheet and carefully transfer that to the wire rack for cooling. Run the baking sheet under cold water to cool it down, then line with parchment paper and repeat the steps to bake a second batch of cream puffs.
- How to freeze cream puffs: The cream puff shells can be frozen for up to 1 month. Bake the shells as indicated, then let them cool to room temperature. Place all the cream puff shells on a baking sheet, then place the sheet in the freezer for at least 3 hours, or overnight.
- Once the shells are frozen hard, gently transfer them to an airtight container (the frozen shells are very fragile and can break easily if they’re not handled with care.) Keep frozen for up to 1 month.
- To use frozen cream puff shells: Preheat the oven to 325°F (160°C). Place the cream puff shells on a baking sheet. Bake for 7 minutes, then transfer to a wire rack and let cool completely to room temperature. (This will return the cream puff shells to their crisp, freshly baked state.) Proceed with filling the cream puffs as indicated below.
To Assemble the Classic Cream Puffs
- Make the Dark Chocolate Glaze: In a small saucepan, bring the cream to a boil. Remove from the heat and add the chopped chocolate. Whisk until most of the chocolate is melted. Cover and let stand for 10 minutes. Whisk gently until completely smooth.
- Transfer the cold pastry cream to a piping bag fitted with a small, round tip.
- Take the Chantilly cream out of the refrigerator.
- Use a serrated knife to cut off the top of each pastry shell. Set each "cap" right by its shell.
- Pipe some pastry cream in the bottom of each shell, about a third of the way up.
- Pipe some Chantilly cream in a swirling motion to top off each shell, making sure the cream peeks out.
- Dip one cap into the dark chocolate glaze, then set over its cream puff. Repeat to finalize all the classic cream puffs.
- SERVING: Serve immediately, or refrigerate for up to 2 hours (on a plate, uncovered) before serving.
Notes
Did you make this?
Tell me how you liked it! Leave a comment or take a picture and tag it with @foodnouveau on Instagram.
This site participates in the Amazon Associates Program, an affiliate advertising program designed to provide a means for the site to earn fees by linking to Amazon and affiliated sites.
If you click on an affiliate link, I may earn advertising or referral fees if you purchase through such links at no extra cost to you. This helps me create new content for the blog, so thank you! Learn more about advertising on this site by reading my Disclosure Policy.
Author: Marie Asselin
Wow, what an incredibly detailed and inspiring guide to making classic cream puffs! The way you’ve broken down the steps, from mastering choux pastry to perfecting the fillings and toppings, makes this elegant dessert feel approachable even for a novice baker like me. I also love how you’ve included helpful hacks, like using a cookie scoop for uniformity and stabilizing whipped cream with mascarpone—it’s clear you’ve thought of everything! The addition of savory options like gougères is such a great idea, too. This post truly makes me want to roll up my sleeves and give it a try. Thank you for sharing your expertise and making this culinary art form accessible to everyone! 🍮✨
Anna, thank you so much for this glowing feedback! I sure hope you’ll give pâte à choux a try, it’s so fun to make and so rewarding too!