- V
- GF
- NS
- DF
- View Recipe Key
How to Make Classic Gnocchi from Scratch (VIDEO)
How to Make Classic Gnocchi from Scratch (VIDEO)
Making classic gnocchi from scratch is so satisfying: once you master these plump little bites, you won’t ever buy them from the store again!
This post contains affiliate links. Full disclosure is at the bottom of the article.
Having been in Italy for two weeks, it has been a bit difficult to keep up with the competition in Project Food Blog, away from home and without access to a kitchen for half of my trip. In case I would participate in the 4th challenge, I paid attention to the food around me in Rome, and tried to find what I would be able to make in my miniscule Trastevere apartment. After seeing it served as a primi piatti in countless restaurants, I decided I would make gnocchi from scratch.
The great thing about gnocchi is that they’re made with few ingredients: potatoes, flour, eggs, olive oil, salt. They also require no special equipment. You can make a large quantity of gnocchi for a few dollars and roll them pretty much anywhere, as I found out when I made a batch on my apartment’s wooden bedside table.
My kitchen in Rome (minus the bedside table).

Although making gnocchi from scratch is easy, it’s also easy to fail. Too much liquid and your gnocchi will be gummy; too much flour and they’ll be dense and heavy on the stomach. When perfect, homemade gnocchi are light and plump.
Gnocchi are lovely served with a variety of different sauces, from a simple fresh tomato to a slowly simmered meat ragù. They’re also delicious au gratin, mixed with a cheesy white sauce and broiled in the oven. Use your imagination! You’ll be so proud that you made your own that I’m sure you’ll find them delicious any way you serve them.
My gnocchi, as I served them in Rome: sauteed in butter and olive oil, with pesto, sprinkled with parmigiano-reggiano, accompanied by a fresh-from-the-market side salad.

If I succeeded in making a delicious dinner in such limited conditions, you can certainly do the same at home! Here’s the walkthrough to making gnocchi from scratch.

How to Make Classic Gnocchi from Scratch
Based on Aglio, Olio e Peperoncino’s tried-and-true family recipe.
Makes enough for 6 to 8 servings.
1 kg (2.2 lbs) russet potatoes (about 5 large), unpeeled
300 g (1 ½ cups) all-purpose flour
2 egg yolks
1 tablespoon extra-virgin olive oil
Salt

Step 1: Cook the potatoes to make the gnocchi dough
Wash your potatoes thoroughly without peeling them. Boiling them unpeeled lessens the water that penetrates the potatoes while they’re cooking. Water is a gnocchi downfall. This is also why you must use the exact cooking time. Avoid piercing them during cooking as it’ll allow water to get in. Small potatoes take 10–15 minutes to boil; medium 20–25 minutes; large 35–45 minutes. If you’re unsure about your cooking time, boil one extra potato that you’ll use to test.
Cooked and peeled potatoes.

Step 2: Mash the potatoes for the gnocchi dough
Once your potatoes are done, drain them and let them cool until you can handle them. Peel the potatoes and mash them into a large bowl: the tool that will help you breeze through this step is a potato ricer. It guarantees lump-free gnocchi. If you don’t have a ricer, mash your potatoes with a fork (like I did) or a potato masher. Pay extra attention to make sure you eliminate as many lumps as possible.
Let the mashed potatoes cool to room temperature.
Mashing potatoes with a fork, until no lumps remain.

Step 3: Prepare the gnocchi dough
Mix flour and salt together in a small bowl. Mix the mashed potatoes with the egg yolks and olive oil. Sprinkle the flour mixture over the potatoes and mix gently until the flour is moistened and the dough looks crumbly.
Mixing the ingredients together until the flour is moistened and the dough looks crumbly.

Lightly flour your work surface. Put your dough on the surface. Knead it gently to incorporate the flour: press on the dough with your hands, fold it in half, turn it by a quarter turn and press it again. You should do this for about 1 minute: over-kneading is another gnocchi downfall. It leads to a tough, rubbery texture.
Kneading the dough using both hands for about 1 minute.

After kneading, your dough should feel soft and smooth. If it sticks to your work surface, sprinkle a bit more flour — but keep in mind that you must limit the amount of flour you add to the gnocchi to make sure they don’t become heavy and dense.
When the dough is ready, put it in a bowl and cover with a clean kitchen towel.
Kneaded gnocchi dough, ready to be rolled into bites.

Step 4: Roll and cut the dough into bites
Clean your work surface, dry it thoroughly and sprinkle lightly with flour. Tear off a lemon-sized piece of dough and roll it into a rope (about 3/4 in. diameter). Use a knife to cut out square bites.
Gnocchi dough ropes, cut into squares.

Now you have two choices: leave your gnocchi plain, looking like miniature pillows, or indent them using a gnocchi board or a fork.
Leaving them plain is a good choice when you want to fry them in butter, or serve them with a classic brown butter (see this recipe). I really like the crunchy texture it renders, a nice contrast to the creamy interior.
Plain pillow-looking gnocchi.

Indenting gnocchi is ideal when you want to serve them with a sauce, because the pattern allows it to better cling to the pasta.
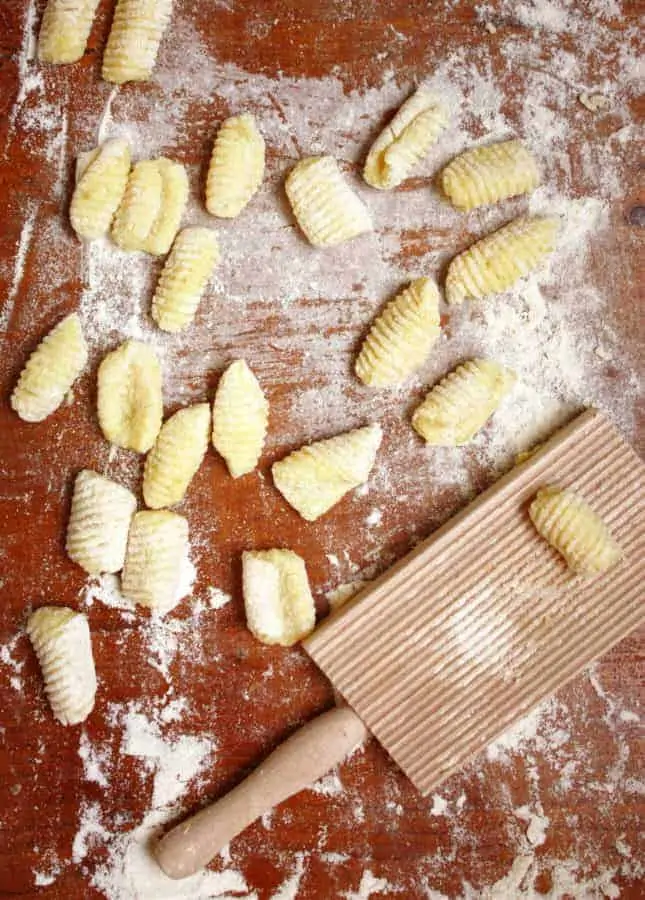
To indent gnocchi, you can use either a gnocchi board or a fork. Pick up one piece of dough and use your thumb you gently roll it over the gnocchi board or the back of the fork to create grooves in the dough. Repeat to roll all the gnocchi. As you roll, transfer them to a parchment paper-lined baking sheet in a single layer, making sure they don’t touch. Gnocchi are best cooked within 2–3 hours of being made (keep at room temperature).
Watch this 30-second video to see how to roll gnocchi using either a gnocchi board or the back of a fork:
My dough was a day old when I filmed this video so it was firmer than usual. When the dough is fresh, the gnocchi needs just a soft press to be indented.
Two kinds of gnocchi side by side: rolled on a special board, and rolled on a fork.

Gnocchi are best cooked within 2–3 hours of being made (keep at room temperature).
To freeze: put the gnocchi on the baking sheets straight into the freezer. Once hard, transfer them to freezer bags in portion sizes. They’ll keep for two months.

Step 5: Cook the homemade gnocchi
Bring a pot of salted water to a rolling boil. Put about 12–15 gnocchi into the water at once and wait until they come back to the surface. When they do, they’re ready. Don’t turn your back on them because it takes just two minutes! Use a slotted spoon to fish them out, put them in a bowl and cover with plastic wrap to keep them warm. Repeat the process until all the gnocchi are cooked.
Classic Gnocchi from Scratch
Ingredients
- 2 lbs russet potatoes (about 5 large), unpeeled
- 1 1/2 cups all-purpose flour
- 2 large egg yolks
- 1 tbsp extra-virgin olive oil
- 1 tsp kosher salt, or fine sea salt
Instructions
Step 1: Cook the potatoes for the gnocchi dough
- Wash the potatoes thoroughly without peeling them. Boiling potatoes with the peel on prevents excess water to penetrates the flesh while they’re cooking. Bring a large pot of water to a boil. Use an exact cooking time and avoid piercing the potatoes during cooking as this will allow water to get in. Small potatoes take 10–15 minutes to boil; medium 20–25 minutes; large 35–45 minutes. If you’re unsure about your cooking time, boil one extra potato that you’ll use to test for doneness.
Step 2: Mash the potatoes to use in the gnocchi dough
- Once the potatoes are cooked, drain them and let them rest until cool enough to handle.Peel the potatoes, then transfer them to a large bowl. Mash the potatoes: a potato ricer is the best rool to create a super smooth potato puree, but you can also use a potato masher or a fork. Make extra sure to eliminate all lumps in the puree.
- Let the mashed potatoes cool to room temperature.
Step 3: Prepare the gnocchi dough
- Add the egg yolks and olive to the mashed potatoes, and mix to combine. In a small bowl, mix the flour and salt together. Sprinkle the flour mixture over the mashed potato mixture and mix gently until the flour is moistened and the dough looks crumbly.
- Lightly flour a work surface. Transfer the dough to the working surface. Knead it gently to incorporate the flour: press on the dough with your hands, fold it in half, turn it by a quarter turn and press it again. Do not over-knead the gnocchi dough: you should do this for just about 1 minute, until the dough feels soft and smooth.
- If the dough sticks to the work surface, sprinkle a bit more flour—but keep in mind that you must limit the amount of flour you add to the gnocchi to make sure they don’t become heavy and dense.
- When the gnocchi dough is ready, put it in a bowl and cover with a clean kitchen towel.
Step 4: Roll and cut the gnocchi dough into bites
- Clean the work surface, then dry it thoroughly and lightly sprinkle with flour. Tear off a lemon-sized piece of dough and roll it into a rope about 3/4 in (2 cm) in diameter). Use a knife to cut the rope of gnocchi dough into square bites.
- You now have two options: you can either leave the gnocchi plain, looking like miniature pillows, or indent them using a gnocchi board or a fork.
- Leaving homemade gnocchi plain is good to fry them in butter, or serve them simply tossed into brown butter.
- Indenting gnocchi is ideal if you plan to serve them with a sauce, because the pattern allows the sauce to better cling to the gnocchi.
- To indent gnocchi you can use either a gnocchi board or a fork. Pick up one square piece of gnocchi dough and use your thumb you gently roll it over the gnocchi board or the back of the fork to create grooves in the dough. Repeat to roll all the gnocchi. As you roll, transfer them to a parchment paper-lined baking sheet in a single layer, making sure they don’t touch. Homemade gnocchi are best cooked within 2–3 hours of being made. Keep the gnocchi at room temperature until ready to cook.
- FREEZING TIPS: Transfer the baking sheet with the homemade gnocchi straight to the freezer. Once the gnocchi are frozen hard, transfer them to freezer bags in portion sizes. They will keep frozen for up two months.
Step 5: Cook the gnocchi
- Bring a large pot of salted water to a rolling boil. Drop 12 to 15 gnocchi into the water at once and wait until they come back to the surface on their own. When they do, they’re ready. Keep a close eye on homemade gnocchi while they cook because it only takes about 2 minutes!As soon as the gnocchi float back to the surface, use a slotted spoon to fish them out. Transfer the cooked gnocchi to a bowl and cover with plastic wrap to keep them warm. Repeat until all the gnocchi are cooked.
- SERVING: In a skillet set over medium heat, warm up the sauce of your choice, then add the gnocchi and toss just to combine. Serve immediately.
- MAKE IT GLUTEN FREE: Use a gluten-free all purpose flour mix instead of regular all-purpose flour.
- Recipe Credit: Adapted from Eleonora Baldwin's tried-and-true family recipe.
Did you make this?
Tell me how you liked it! Leave a comment or take a picture and tag it with @foodnouveau on Instagram.
This site is a participant in the Amazon Associates Program, an affiliate advertising program designed to provide a means for the site to earn fees by linking to Amazon and affiliated sites.
If you click on an affiliate link, I may earn advertising or referral fees if you make a purchase through such links, at no extra cost to you. This helps me creating new content for the blog–so thank you! Learn more about advertising on this site by reading my Disclosure Policy.
Author: Marie Asselin
Nice
Love your content! Very impressed with the knowledge you have. I am a professional chef and this is something that i would actually cook in this way, is a great article. Very good photos and explanation. I have started my own Blog aswell and i think i will come back often to find some inspiration, keep up the great work!
Thanks for this recipe! I’ve used it quite a few times now, and the gnocchi always comes out really well!
This recipe was amazing. I followed the directions and used 4 potatoes as mine were more like extra-large! I then put the gnocci in an Italian Sausage Soup. It was delicious! Thank you so much for the clear directions. I would have voted for you too!
Happy the recipe worked out for you Mary. I love the idea of throwing fluffy gnocchi in a soup. I’ll make sure to try that!
As I told you before I live in Mexico. The only potatoes I see here are white rose or red skin. I make potatoes in Microwave. I wrap them in a damp paper towel. We have incredible types of sweet potatoes. Some are white as snow, others almost fusha, and all colores yellow to orange. I hear they make great gnocchi. I’ve never tried to make gnocchi do you know about white rose potatoes or sweet potatoes?
You never state how many this recipe feeds….
The recipe makes enough gnocchi for 6 to 8 servings. (I updated the recipe to add the info–thanks for the notice!)
I was googling for gnocchi recipes and found many. Yours, however, had GREAT photography and so I went with your recipe last night. Stellar! Thank you so much. It will be my contribution to this year’s Thanksgiving.
Rudy
Thanks for the break-down. You have no idea how much help this was, video and all. Your awesome!
Thank you! Happy the video and instructions helped.
This recipe was great! Thank you! I tried making gnocchi for the first time last night and was very pleased! The video on how to roll them with a fork was really helpful too. I just changed two things: I baked the potatoes instead of boiling them and used a fine cheese grater to grate the hot potatoes instead of mashing them. Yum, yum!
i love it
i cant wait to make it
I just came across your gnocchi recipe & instructions. Had I come across it earlier, I would have voted for you. I’m getting ready to make gnocchi for the first time (and use a gnocchi board for the first time). I have a basic recipe but not very clear instructions from one of my cookbooks. We have two kinds of potatoes from the garden but neither are russet. I think they are new reds and new Yukon golds. I guess I’ll find out how they work for gnocchi. Can’t wait! I’ll definitely come back to your site. Your instructions are clear & concise. Thank you!