- V
- GF
- NS
- DF
- View Recipe Key
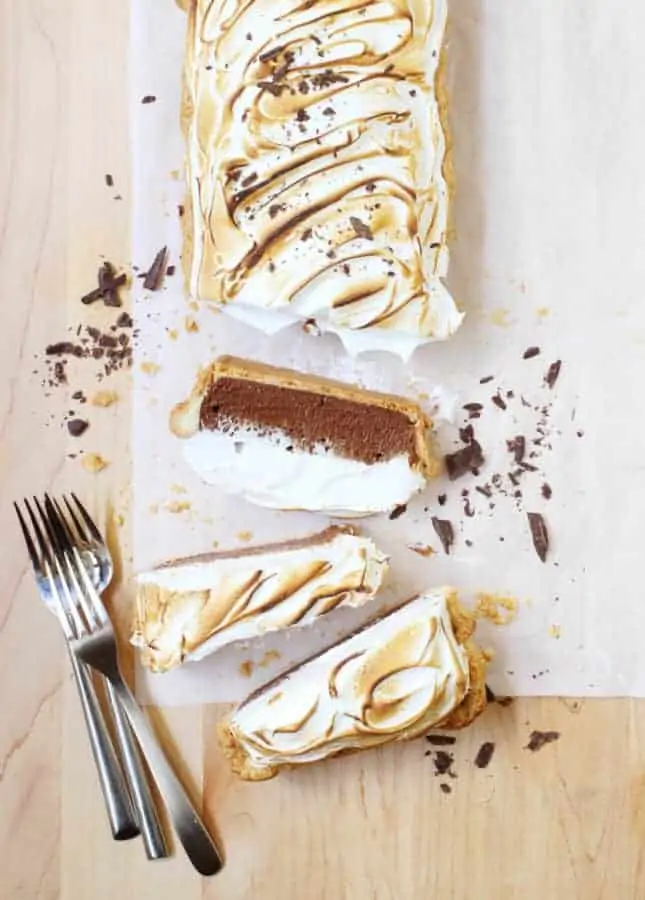
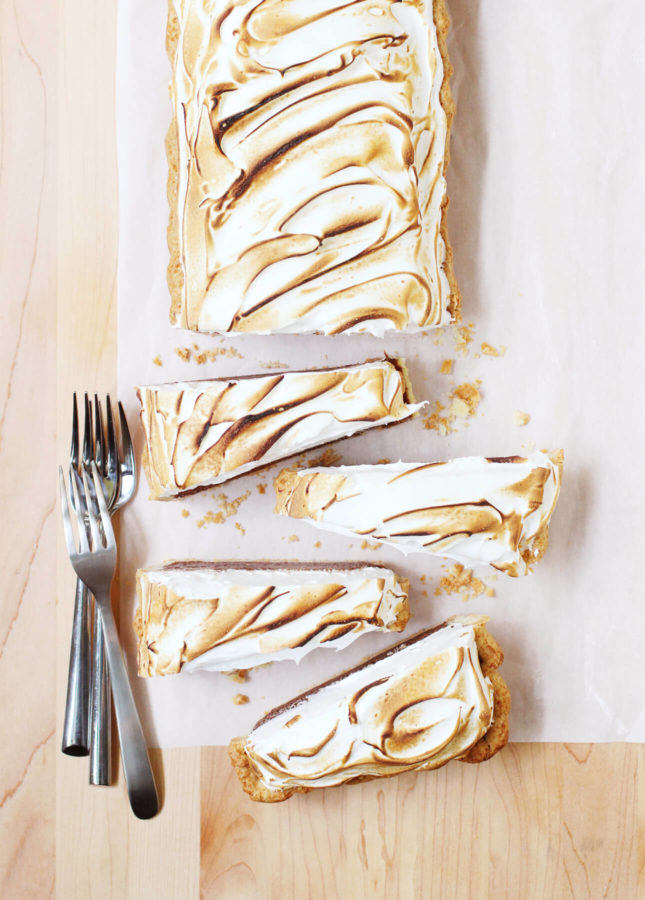
Chocolate Meringue Pie
Chocolate Meringue Pie
This fluffy, dreamy Chocolate Meringue Pie will bring you to cloud nine. The sweet meringue contrasts beautifully with the bitter, creamy filling, making each bite an unforgettable delight.
This post contains affiliate links. Full disclosure is at the bottom of the article.
The first third of the year is gone, and spring is around the corner. Time has slipped through my fingers and I’m just now getting around to sharing my first recipe of the year. I know, I can’t believe it either!
Granted, I’ve had a busy start of the year:
- We bought a new flat downtown Quebec City, which we then remodeled top to bottom and moved into (man, packing and unpacking a house you lived into for 12 years is A LOT of work!)
- My first cookbook was published in French in early February: Citrons, oranges et cie is the translation of my first book baby, Simply Citrus
- My second cookbook was published in March: French Appetizers
- We traveled to Japan for three weeks, which was a trip we dreamed of taking before our son started kindergarten. Mission accomplished! I even got to check a dream off my list: gawking at full-bloom Japanese cherry blossoms.
So I’ve been busier than ever, but now things are settling down and I’ve been missing testing and creating recipes for the blog. What better time to get back into the swing of things than chocolate (ahem, Easter) season, and what better treat to celebrate my return than this extraordinary Chocolate Meringue Pie?
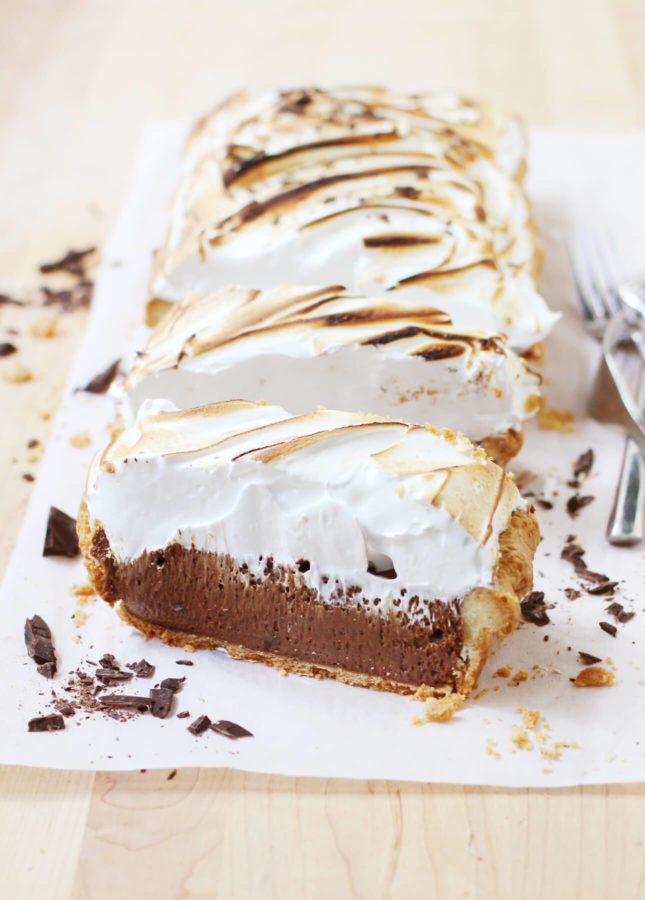
Created by baker extraordinaire Sarah Kieffer of The Vanilla Bean Blog, this fluffy, dreamy, chocolatey pie will bring you to cloud nine. The sweet, toasty meringue contrasts beautifully with the bitter, creamy filling, making every bite utterly unforgettable.
The pie is a bit of work to make, but the techniques are not tricky, especially if you follow Sarah’s helpful detailed instructions. It’s a pie that makes any day extraordinary, it’s the pie you should make for the people you love the most.
Helpful Tips to Make Chocolate Meringue Pie
- Use the right equipment: You do not have to have a stand mixer to make this pie, but because there’s quite a bit of beating going on in this recipe, using a stand mixer frees your hands for other tasks. Using a hand mixer counts as your work out for the day, though! :)
- Plan ahead: This Chocolate Meringue Pie comes together in three steps:
- Make the pie crust, blind bake it, then let it cool completely
- Make the chocolate filling, pour it in the crust, then refrigerate for 4 hours, or overnight
- Make the meringue and toast it
It’s a good idea to split the work over two days: make the crust and filling a day ahead, then make and toast the meringue up to a half-day before serving.
- Eat the pie ASAP: Meringue starts “weeping” (releasing liquid) after about 12 hours, so the pie should ideally be enjoyed the day it’s made. If you ever have leftovers, store them at room temperature in an airtight container or under a cake dome for up to a day. Believe me: Chocolate Meringue Pie makes a pretty fine breakfast!
VIDEO: Watch how to make shortcrust pastry IN SECONDS using your food processor
Watch my Shortcrust Pastry recipe video to discover how easily you could be making shortcrust pastry from scratch, too!
Chocolate Meringue Pie Recipe
Ingredients
- 1 batch foolproof shortcrust pastry fully baked and cooled (see note)
For the chocolate filling
- 1/2 cup 125 ml heavy cream
- 7 oz 199 g bittersweet or dark chocolate (70% cocoa), melted and cooled
- 4 large eggs
- 3/4 cup 149 g / 180 ml granulated sugar
- 1/4 cup 50 g / 60 ml packed brown sugar
- 1/4 tsp 1 ml kosher salt
- 3 tbsp 45 ml coffee or water, room temperature (see note)
- 2 tsp 10 ml pure vanilla extract
- 8 tbsp 1 stick / 113 g / 1/2 cup unsalted butter, room temperature and cut into pieces
For the meringue
- 5 large egg whites
- 1 cup 198 g / 250 ml granulated sugar
- 1/4 tsp 1 ml kosher salt
- 2 tsp 10 ml pure vanilla extract
Instructions
- For the chocolate filling: In the bowl of a stand mixer fitted with the whisk, beat the heavy cream on low speed until small bubbles form, about 30 seconds. Increase the speed to high and continue beating until the cream is smooth, thick, and nearly double in volume, about 30 seconds. Transfer the whipped cream to a bowl and place it in the refrigerator. Clean the mixing bowl if you have only one.
- Put about 1 inch (2 cm) of water in a medium saucepan and bring to a gentle boil. Melt the chocolate in a heatproof bowl set over the pan of boiling water, being careful not to let the water touch the bottom of the bowl. Stir constantly until just melted and set aside to cool. Add more water to the saucepan if needed and bring to a boil again.
- In the (clean) bowl of a stand mixer, stir the eggs, sugars, salt, and coffee to combine. Place the bowl over the saucepan, being careful not to let the water touch the bottom of the bowl. Stir with a silicon spatula until the sugar is completely melted and reaches a temperature of 160 °F (71°C), 4 to 5 minutes. While you are stirring, be sure to scrape down the sides of the bowl with the spatula—this will ensure no sugar grains are lurking on the sides and will help prevent the eggs from cooking and curdling.
- Remove the bowl from the heat and place it in the stand mixer fitted with a whisk. Whisk on high until light and fluffy, 8 to 10 minutes. The bowl should have cooled down to room temperature at this point. Switch to the paddle attachment, add the chocolate and vanilla, and beat on low until combined. With the mixer running on medium, add a few pieces of butter at a time, beating until completely incorporated. Remove the bowl from the mixer and, using a spatula, gently fold in the chilled whipped cream.
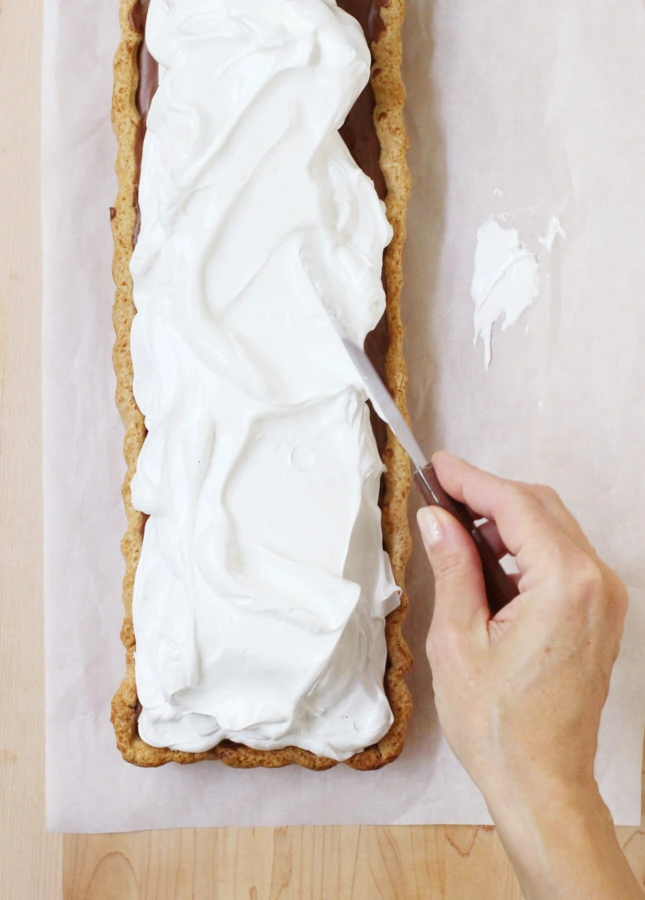
- Pour the filling into the prepared pie crust and use an offset spatula to even out the top. Move the pie to the refrigerator and cover the top of the pie with a piece of parchment paper to keep off condensation. Let the pie chill at least 4 hours, or overnight.
- Up to a half-day before serving, top with the meringue.
- For the meringue: Put about 1 inch (2 cm) of water in a medium saucepan and bring it to a gently boil.
- In the bowl of a stand mixer, stir the egg whites, sugar, and salt to combine. Put the bowl over the saucepan, being careful not to let the water touch the bottom of the bowl. Stir with a rubber spatula until the sugar is completely melted and reaches a temperature of 160°F (71°C), 4 to 5 minutes. While you are stirring, be sure to scrape down the sides of the bowl with the spatula—this will ensure no sugar grains are lurking on the sides and will help prevent the egg whites from cooking and curdling.
- Remove the bowl from the heat and place it in the stand mixer fitted with a whisk. Whisk on medium-high until stiff, glossy peaks form, 8 to 10 minutes. The bowl should have cooled down to room temperature at this point. Add the vanilla and beat on low until combined.
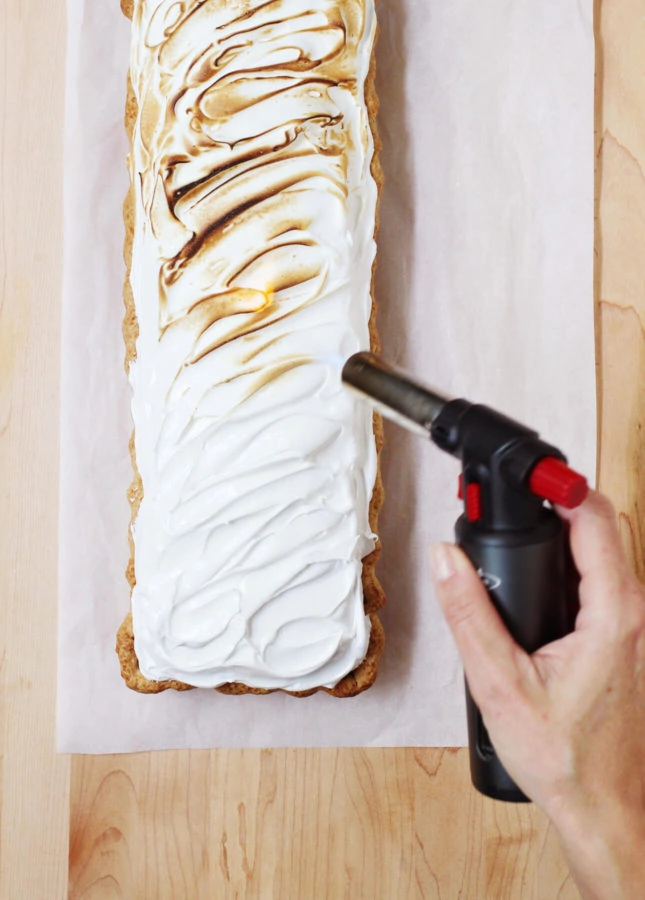
- Take the chilled pie from the refrigerator and remove the parchment paper. Use a spatula to spread the meringue over the top of the pie. Use a spoon to create swirls and peaks in the meringue. Hold a kitchen blowtorch 1 to 2 inches (2 to 5 cm) away from the meringue and touch the flame down in between the curls. The curls will toast and brown. Do this until you are happy with the color.
- If you do not have a kitchen blowtorch, you can brown the meringue under a broiler. Adjust your oven rack so the pie will be about 4 inches (10 cm) below the broiler. Preheat the broiler. Place the pie on a baking sheet and place the sheet under the broiler until the tips of the meringue curls begin to brown, turning the sheet as needed. Because the pie is chilled, it is important to take it out of the oven as soon as possible so the filling doesn’t melt.
- The pie is best served within a few hours.
Notes
- You can use a regular 9 inch (23 cm) pie plate to bake this pie, or, for a change, use a rectangular 14 x 4 inch (35.5 x 10 cm) tart pan (pictured in this post).
- Read how to blind bake a pie crust right here.
- If you don’t like coffee, let me reassure you: the tart does not taste like coffee at all. Adding a small quantity of coffee underlines and deepens the flavor of the chocolate. You can use decaf coffee if you don’t want the extra dose of caffeine in the tart.
Did you make this?
Tell me how you liked it! Leave a comment or take a picture and tag it with @foodnouveau on Instagram.
Recipe by Sarah Kieffer, from The Vanilla Bean Baking Book. Shared with permission from the author.
This site is a participant in the Amazon Associates Program, an affiliate advertising program designed to provide a means for the site to earn fees by linking to Amazon and affiliated sites.
If you click on an affiliate link, I may earn advertising or referral fees if you make a purchase through such links, at no extra cost to you. This helps me creating new content for the blog–so thank you! Learn more about advertising on this site by reading my Disclosure Policy.
Author: Marie Asselin
WHAT DID YOU THINK OF THIS RECIPE?
Rate + Review