- V
- GF
- NS
- DF
- View Recipe Key
How to Make Roman-Style Pizza from Scratch (Inspired by Rome’s Forno Campo de Fiori Pizza)
How to Make Roman-Style Pizza from Scratch (Inspired by Rome’s Forno Campo de Fiori Pizza)

This Roman-style pizza recipe will teach you how to make this crisp, thin-crust pizza from scratch, inspired by the memorable pizza sold at Rome’s Forno Campo de Fiori.
This post contains affiliate links. Full disclosure is at the bottom of the article.
When I think back on my many trips to Italy, of all the amazing food I’ve enjoyed over the years, it’s always Roman-style pizza that comes back to me first. In Rome, I’ve enjoyed pizza al taglio (pizza by the slice) at many different trattorie, but the first slice I run to as soon as I arrive in the city, jet-lagged and hungry, is the unfussy one served at Forno Campo de’ Fiori. This take-out counter is always packed, and keeping your spot in line without being passed by locals well used to the place’s chaotic ordering and checkout process is a bit of a sport—and that’s why I love it so much. The prize is absolutely worth the struggle.

Yours truly, 15 years ago, gesturing how much pizza I wanted at Forno Campo de’ Fiori:

Forno’s pizza is cooked as long pies and served with different toppings, but the combinations are always beautifully simple. Usually, just two or three carefully chosen ingredients garnish the crunchy dough. The place is also famous for its minimalist pizza bianca, topped only with olive oil and coarse sea salt—a true poster child for the merits of culinary simplicity.
Forno Campo de’ Fiori’s pizza bianca:

Over the many times I’ve visited Forno, I may have tried all the varieties they serve, but the one I keep going back to is the zucchini pizza. I make sure to order a slice on every trip! The soft, nutty taste of thinly sliced zucchini, the milkiness of fresh mozzarella, and the saltiness of the crust are simply unforgettable. It’s the perfect illustration of what makes pizza romana so surprisingly addictive: the simplest ingredients come together in a perfect bite, time after time.

After my first trip to Rome, I started experimenting with making Roman pizza myself, trying to come as close as possible to Forno’s.
Much of the challenge was the crust: Roman-style pizza should be thin and crisp, which isn’t always easy to reproduce in a regular home oven. Then I found a recipe that brought me much closer to the texture I was after. The dough stretched easily, rolled out beautifully thin, and baked up with exactly the kind of crunch I’d been chasing.
I now believe I’ve found the perfect Roman-style pizza dough. If you like thin, crispy pizza, I think you’ll fall in love with it too. And once you’ve made the dough, the secret is simple: keep the toppings restrained and use the very best ingredients you can find. This is the time to reach for your best olive oil, splurge on mozzarella di bufala, and sprinkle with flaky sea salt. Your taste buds will thank you.

VIDEO: How to Make Roman-Style Pizza from Scratch
If you’d like to see exactly how I make this Roman-style pizza from start to finish, watch the video below. I show you how the dough should look, how thin to roll it for that signature crisp texture, and how I top it so the crust stays beautifully crunchy while the toppings roast to perfection.
Helpful Tips for Making Roman-Style Pizza
Roman-style pizza is all about contrast: a thin, crisp crust with just enough chew to keep it interesting. It’s quite different from the puffier, more blistered Neapolitan style many people picture when they think of Italian pizza. This Roman version is better suited to a regular home oven, especially when you roll the dough very thin and bake it on a thoroughly preheated surface.
Spread out the dough thinner than you think
If you want that signature Roman crunch, spreading the dough extra-thin matters. A thicker crust can still be delicious, of course, but it will move the final result away from classic Roman-style pizza and closer to a more generic flatbread pizza. If your dough keeps springing back as you spread it with your hands, let it rest for 5 to 10 minutes, then try again. A short rest relaxes the gluten, making the dough much easier to stretch.

A pizza stone is the best tool for the job
If you want truly crisp Roman-style pizza, I strongly recommend baking it on a pizza stone. It’s the best way to mimic the intense bottom heat of professional wood-fired ovens, which is exactly what gives this style its signature crunch. I especially like a rectangular pizza stone, which gives you more room to shape the dough in that classic Roman rectangle rather than forcing it into a round.

You don’t necessarily need a specialty pizza stone, however. Some home bakers use a simple unglazed quarry tile or terracotta tile from the hardware store instead. If you go that route, make sure it’s rough, unglazed, and completely untreated—no glaze, no sealant, no finish. I can’t vouch for every hardware-store tile, so I’d stick to the plainest possible option.
The goal is always the same: a thoroughly preheated surface that delivers strong bottom heat for maximum crispness. If you don’t have a stone at all, you can still use a heavy preheated sheet pan—but for this particular pizza, a stone really does make the biggest difference.
If you bake pizza often, I think a rectangular pizza stone is well worth owning. It costs around US$30 and it’s one of the easiest ways to achieve a true Roman-style texture at home.
Preheat longer than feels necessary
A hot oven is good; a fully heat-saturated baking surface is better. Give your pizza stone enough time to absorb heat so it can immediately start crisping the bottom crust. This is one of the biggest differences between pizza that turns out pale and soft and pizza that develops that crackly, golden underside that Roman-style pizza is known for.
Keep the toppings light
Roman-style pizza is not the place for a mountain of toppings. Too much sauce, too much cheese, or ingredients that release a lot of moisture can soften the crust before it has a chance to crisp. This style really shines with restrained combinations—just a few excellent ingredients, thoughtfully paired. That’s one of the reasons classics like pizza bianca and simple seasonal vegetable toppings work so well.

Use fresh mozzarella di bufala—or burrata for finishing
If you want your Roman-style pizza to taste truly special, skip the bagged grated mozzarella. That classic pizza cheese melts into a thick, uniform blanket, which works well on American-style pizza, but it doesn’t really suit pizza romana.
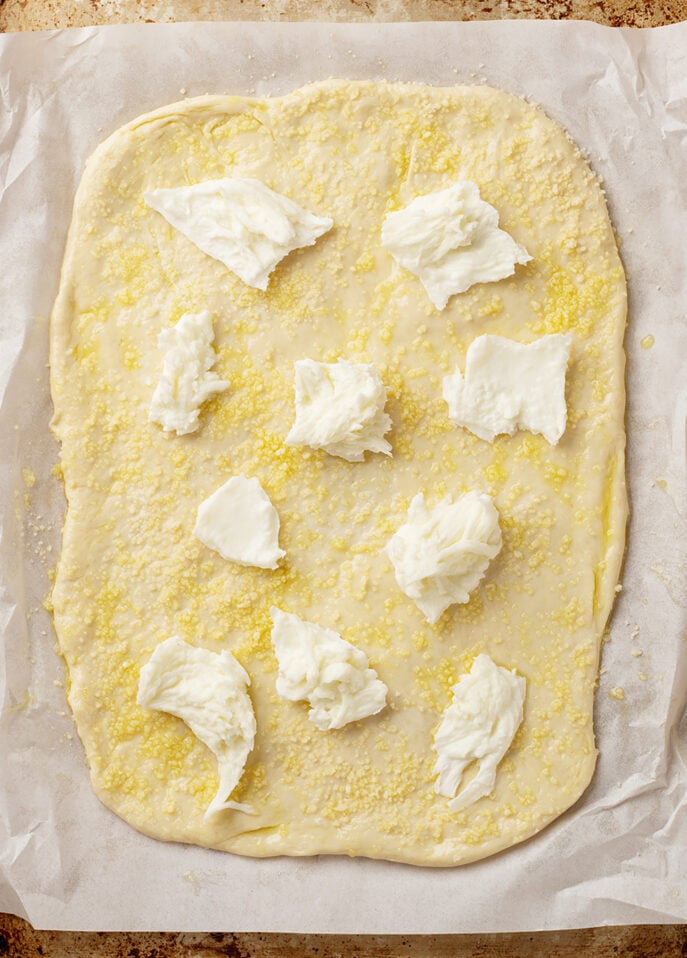
Roman-style pizza is all about contrast: a thin, crisp crust, restrained toppings, and ingredients that still keep their own identity once baked. Fresh mozzarella di bufala is much better here because it melts into creamy little pockets with a clean, milky flavor instead of covering the whole pizza in a heavy layer.

When I use fresh mozzarella di bufala, I add it before baking, and I place it right over the oiled dough, under the other toppings. That’s the opposite of the classic North American approach, but it works beautifully here: the cheese melts into the crust and creates a savory base, while the vegetables or cured meats on top can roast properly instead of being trapped under a blanket of cheese.
Burrata, on the other hand, should be treated as a finishing cheese. It’s best torn over the pizza after baking, just before serving, so it stays cool, soft, and creamy rather than melting away in the oven.
Be strategic with wet ingredients
Fresh mozzarella, tomatoes, and zucchini are all delicious here, but they need a bit of care. Pat fresh mozzarella dry. Drain or roast tomatoes if they’re especially juicy. Slice zucchini thinly so it cooks quickly and doesn’t steam the crust. If the topping feels damp before the pizza goes into the oven, the crust will pay for it.

Don’t expect it to look perfect
One of the charms of Roman-style pizza is that it can be slightly rustic and irregular. A large rectangle with rounded corners is exactly right. It doesn’t need to be a perfect geometric shape to be authentic—or delicious.
Use flour, not cornmeal, to handle the dough
I prefer using flour to prevent the dough from sticking rather than cornmeal, which is often recommended in other recipes. Cornmeal adds both flavor and texture to the crust, and while you do see that in some modern Roman pizza shops, it doesn’t feel quite right to me here.
If the dough has been kneaded properly, and you add just enough flour along the way to keep it manageable, you really shouldn’t need much more by the time it’s ready to be rolled out. The goal is to help the dough along, not coat it. Too much extra flour can dry the surface; cornmeal, on the other hand, creates a coarser, crunchier underside that pulls the pizza away from the thin, crisp, more delicate texture I’m after.
Shape the pizza right on parchment paper for easy handling
I always shape and spread this dough directly on parchment paper so I don’t have to move it once it’s stretched out. That makes the whole process easier, especially with such a thin crust. Once the pizza is topped, I slide the parchment onto the back of a baking sheet, which works like a peel, then use it to transfer the pizza onto the hot stone in the oven—and to pull it back out again afterward. It’s simple, practical, and it saves your hands from getting anywhere near that blazing-hot stone.
Parchment paper also makes the transfer much less stressful, but it’s worth checking the temperature rating on the brand you use. Many common parchment papers are rated to about 420 to 425°F, though some specialty papers may go higher, so don’t assume they’re all the same. Keep the parchment trimmed neatly so it doesn’t overhang, and make sure it doesn’t touch the oven walls or heating elements. I especially like using pre-cut parchment sheets because they’re so handy—and they’re a great fit for a rectangular pizza stone.

Finish with your best ingredients
This is a simple pizza, which means every ingredient stands out. Good olive oil, good cheese, and flaky sea salt make a real difference. Roman-style pizza proves that restraint is not deprivation; it’s precision.
Enjoying a slice at Casa Manco, my favorite Roman pizza joint at Testaccio Market, in Rome.

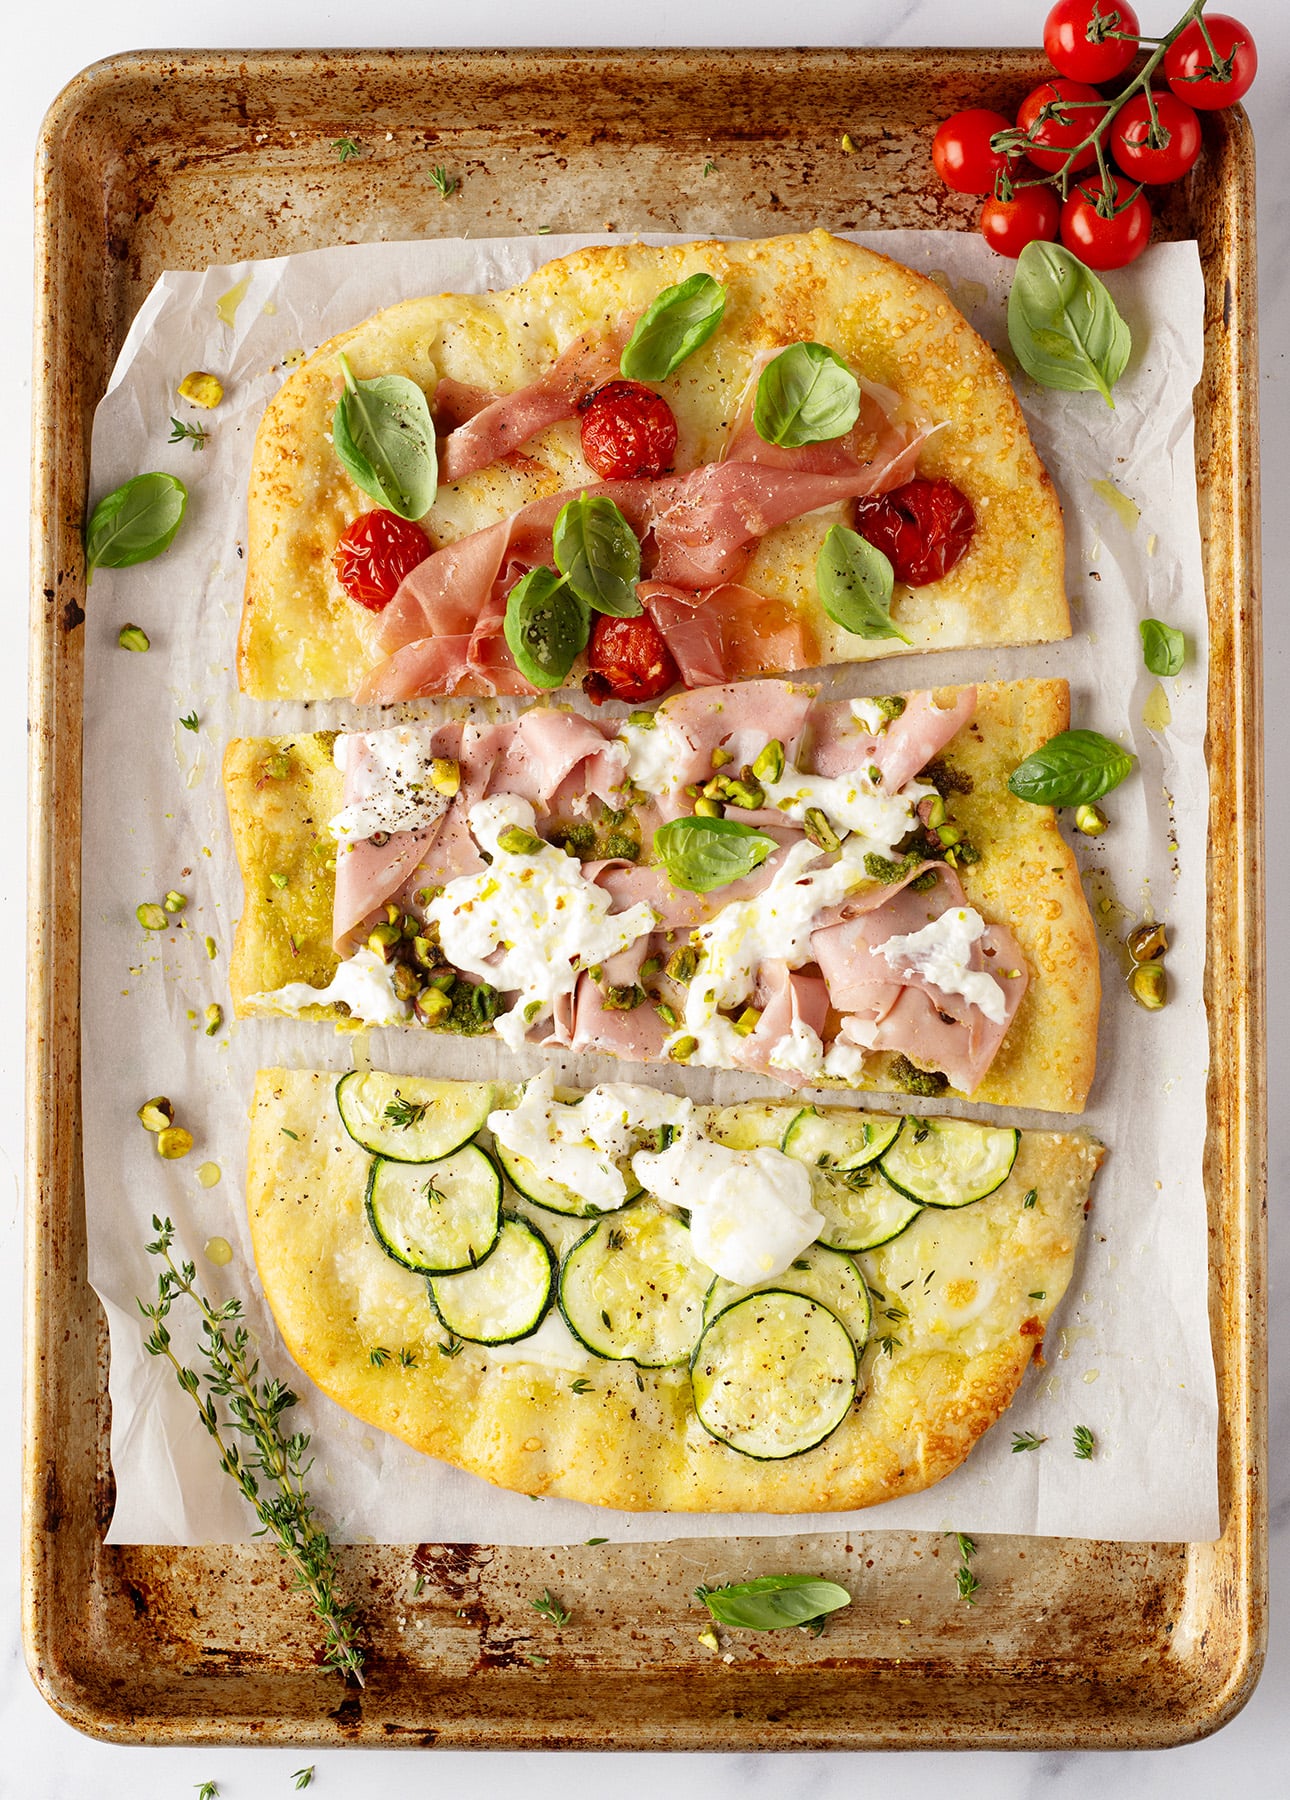
Classic Roman-Style Pizza Toppings
One of the reasons I love this dough so much is that it’s incredibly versatile. Once you have the crust down, you can go in many different directions, from the minimalist Roman classics to slightly more indulgent combinations.
No matter what toppings I use, though, I always start the same way: I brush the dough with olive oil—sometimes garlic-infused olive oil—then sprinkle over finely grated Parmigiano Reggiano and a little sea salt around the edges. It gives every pizza a deeply savory flavor base and helps the crust turn beautifully golden and crisp.

Pizza Bianca (Roman White Pizza)
Pizza bianca is one of the simplest and most classic Roman pizzas: no sauce, no cheese, just a good slick of olive oil and salt. I like to make mine with garlic-infused olive oil for even more flavor, which turns this minimalist pizza into something surprisingly addictive. It’s the kind of recipe that proves just how delicious a really good crust can be.
Pizza bianco from Forno Campo de’ Fiori, in Rome.
Pizza Rossa (Roman Red Pizza)
Pizza rossa is the tomato-topped cousin to pizza bianca: no cheese, just a thin layer of tomato, olive oil, and oregano baked over crisp Roman-style crust. I don’t recommend using pre-flavored store-bought tomato sauce; all you need is passata (strained tomato puree) for a smooth, clean tomato flavor that lets the oregano shine. It’s simple, punchy, and one of the best ways to appreciate how good this dough tastes on its own.
A man serving pizza rossa at Antico Forno Roscioli, in Rome.

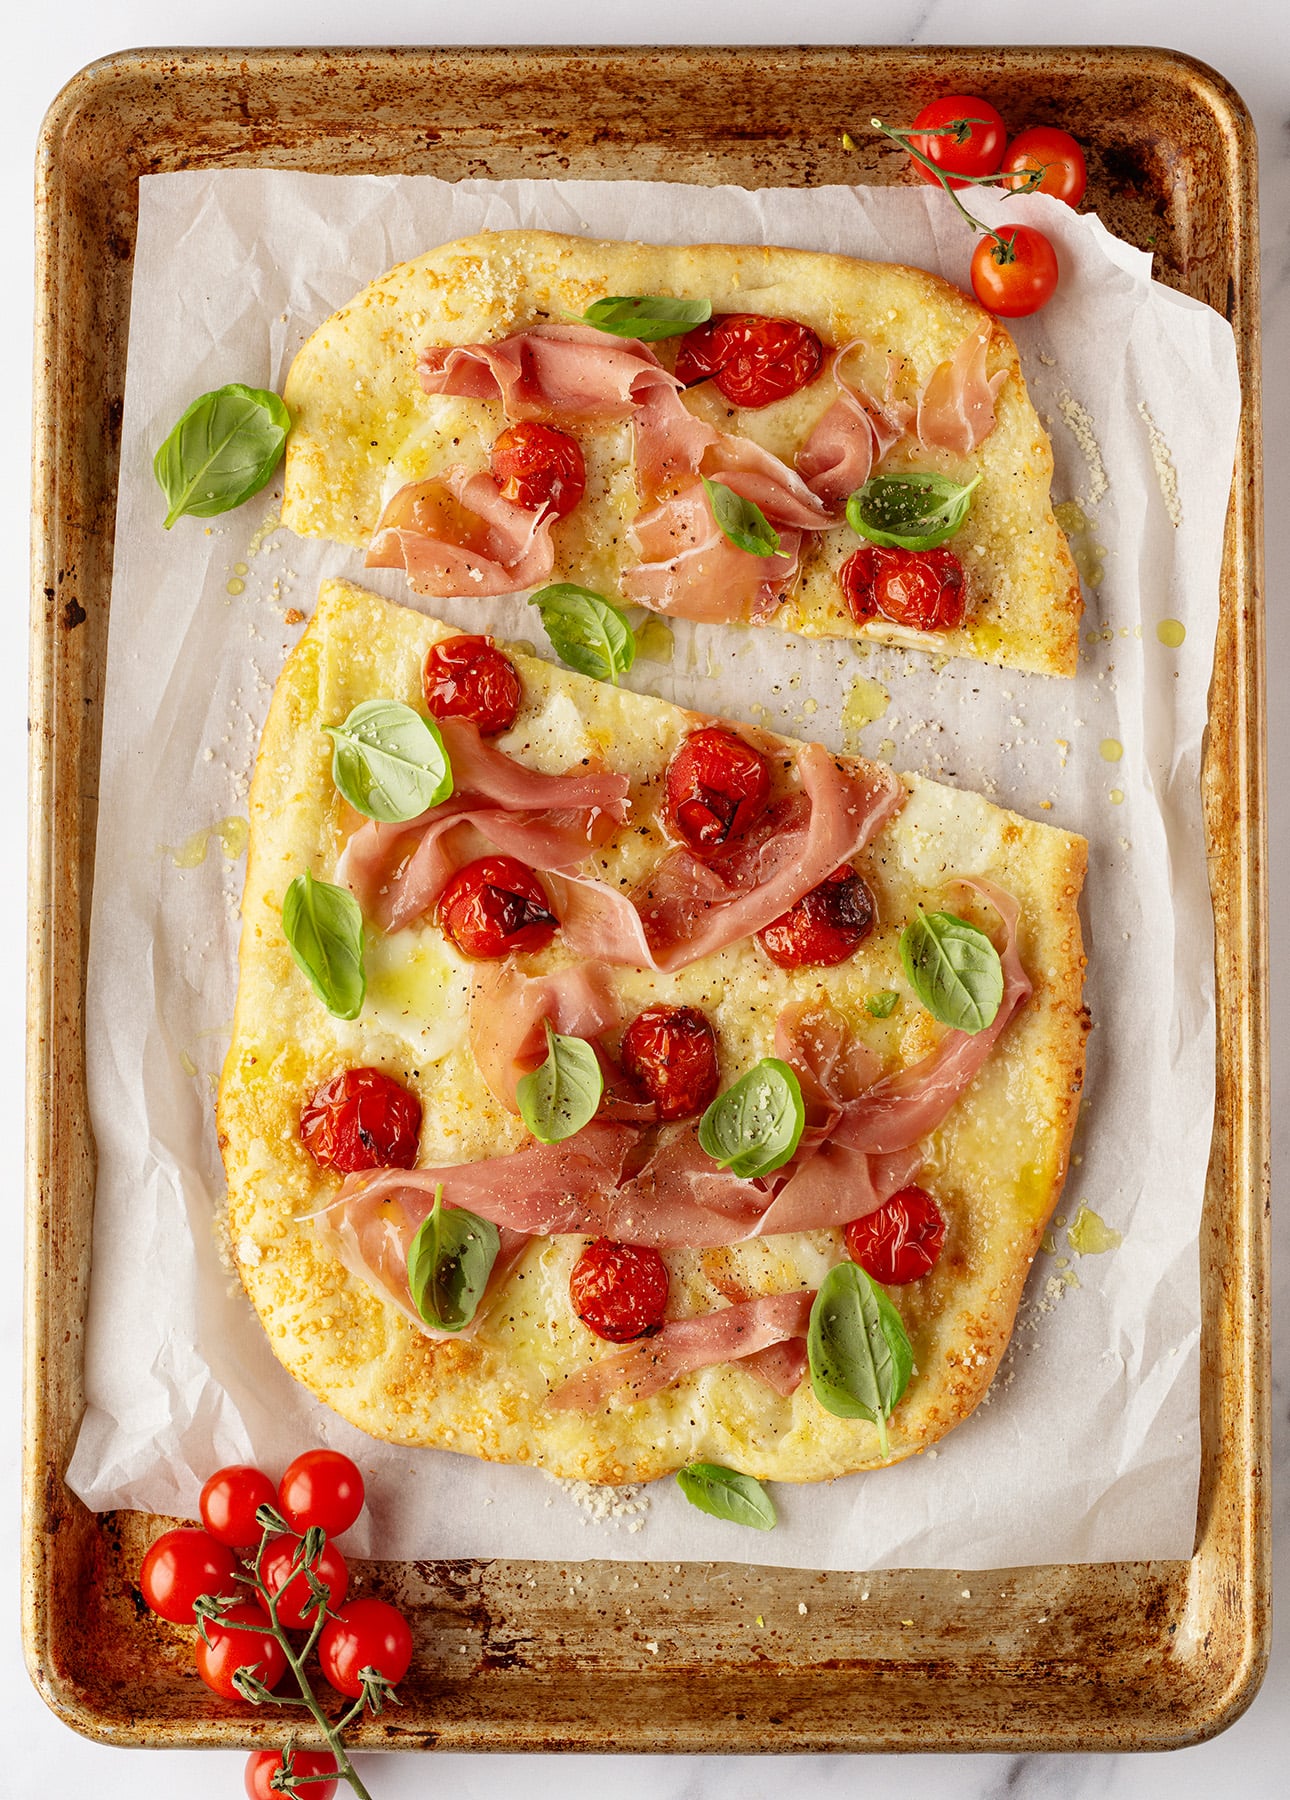
Prosciutto and Cherry Tomato Roman-Style Pizza
This is the Roman-style pizza I make most often at home. I first broil the cherry tomatoes in the preheated oven so they collapse, caramelize slightly, and concentrate their flavor before they go onto the pizza with prosciutto. The result is fresh and savory at once, with just enough sweetness from the tomatoes to balance the salty cured ham.

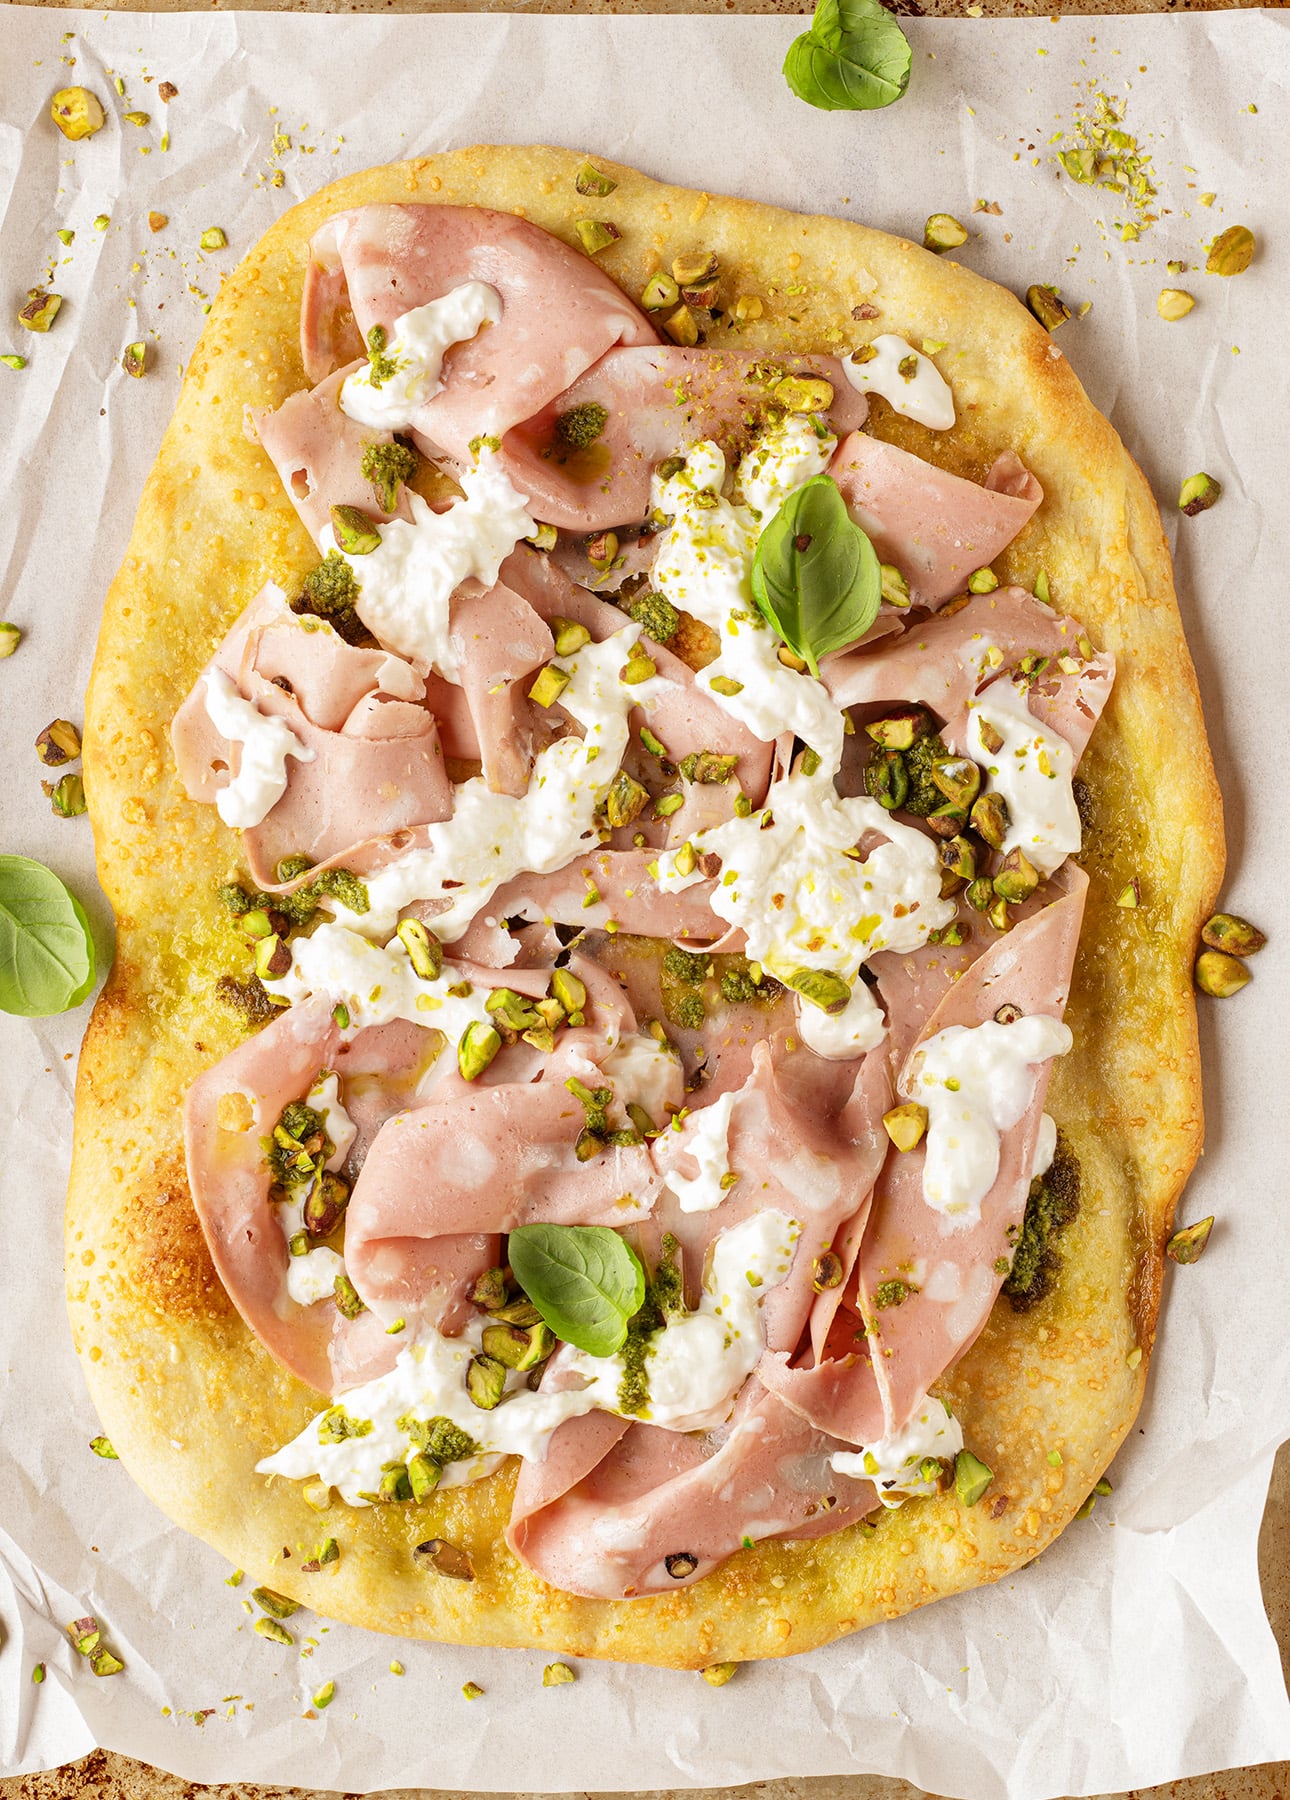
Mortadella, Burrata, and Pistachio Pizza
This combination is pure luxury, but still very Italian in spirit. Inspired by Sicily—where mortadella, pistachio, and creamy cheese are a natural match—this pizza layers rich mortadella with cool burrata and crunchy pistachios for contrast. It’s the kind of pizza I’d serve when I want something a little more dramatic, but still rooted in a classic flavor pairing.
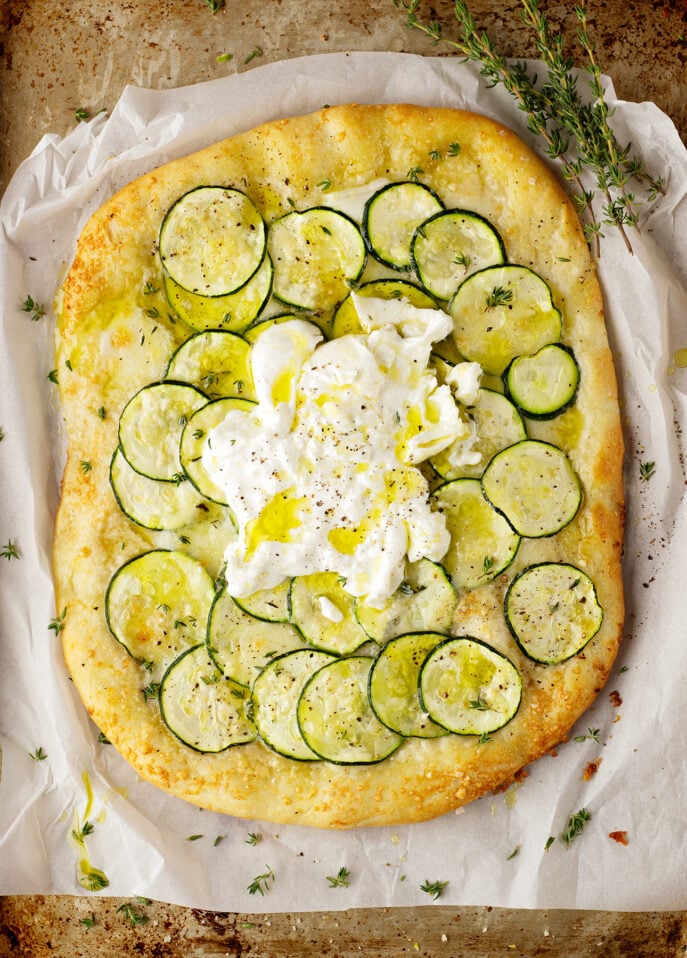
Zucchini and Thyme Roman-Style Pizza
This one is especially close to my heart because it’s inspired by the unforgettable zucchini pizza I had at Forno Campo de’ Fiori in Rome. Thinly sliced zucchini softens and sweetens in the oven, while thyme adds a gentle herbal note that makes the whole pizza feel elegant and restrained. If you like quieter, more delicate flavors, this is such a lovely one.

Potato and Rosemary Roman-Style Pizza
Potato and rosemary is one of the great Italian pizza combinations, and it’s especially good on a crisp Roman-style crust. The classic version is often made without cheese, letting the olive oil, rosemary, and thin slices of potato do all the work, but I also love adding mozzarella when I want a slightly richer finish. Either way, it’s deeply comforting and far more flavorful than it sounds.
A mouth-watering assortment of pizza in teglia, including Potato and Rosemary (bottom left) from Antico Forno Roscioli, in Rome.

Sausage, Rapini, and Chili Flake Pizza
This pizza leans a little more toward generosity and robustness, with savory sausage, pleasantly bitter rapini, and a touch of heat from chili flakes. I like to finish it with a drizzle of honey, which rounds everything out beautifully. It’s inspired both by the classic Southern Italian pairing of sausage and bitter greens and by one of my favorite pizzas from a local Québec City pizzeria.
Even More Pizza Recipes
If you enjoy homemade pizza, you might also like my Breakfast Pizza, Feta, Chickpea, and Eggplant Pizza, or Pancetta and Brussels Sprout Pizza. They’re different in style, but all great ways to put homemade pizza dough to good use.
Roman-Style Pizza FAQ
What is the difference between Roman-style pizza and Neapolitan pizza?
Roman-style pizza and Neapolitan pizza are very different in texture and style. Neapolitan pizza has a soft, airy crust with a puffy edge and a tender center. Roman-style pizza, on the other hand, is much thinner and crispier, with more crunch from edge to center. If Neapolitan pizza is all about softness and char, Roman-style pizza is all about thinness, structure, and that irresistible crackly bite.
What is pizza in teglia? Is it the same as Roman-style pizza?
Yes—pizza in teglia is one of the classic Roman pizza styles. The name simply means “pizza in a pan,” and it usually refers to pizza baked in a rectangular tray, then sliced into squares or strips. That said, Roman-style pizza is a broader category, so you’ll also see different shapes and presentations. For home baking, though, the terms often overlap quite a bit.
At Netflix-famous restaurant Bonci, pizza in teglia is unusually generous with its toppings—and absolutely memorable.

Can I make Roman-style pizza without a pizza stone?
You can, but a pizza stone really does make a difference. Roman-style pizza is all about a crisp bottom crust, and a well-preheated stone gives you the intense bottom heat that helps create that texture. If you don’t have one, you can preheat a heavy baking sheet and use that instead. The pizza will still be good—but if you bake pizza often, a rectangular pizza stone is one of the best tools you can own.
Why didn’t my Roman pizza crust turn crispy?
Usually, it comes down to one of a few things: the oven or stone wasn’t hot enough, the dough was rolled a bit too thick, or the toppings added too much moisture. Roman-style pizza really benefits from being rolled thin, baked on a thoroughly preheated surface, and topped with a light hand. Too much sauce, too much cheese, or watery vegetables can all soften the crust. This is not the time for abundance. A little restraint goes a long way.

Can I make Roman-style pizza dough ahead of time?
Absolutely. In fact, it’s a great dough to make ahead. You can refrigerate it for later use or freeze it if you want to plan further ahead. That makes it especially handy for entertaining or for those nights when you want homemade pizza without starting from scratch a few hours before dinner.
To thaw frozen Roman-style pizza dough, transfer it to an oiled bowl, cover with plastic wrap, then place in a warm spot for several hours (in a turned-off oven, for example.) It takes 3-4 hours to thaw, so I usually take the dough out in the morning to bake it for dinner. The dough can sit at room temperature for a few hours once fully thawed.
Can I bake Roman-style pizza on a sheet pan?
Yes, especially if that’s what you have on hand. A preheated sheet pan can help you get good bottom color and a decent amount of crispness. If you have two identical sheet pans, I recommend stacking them and preheating them in the oven for at least 20 minutes before transferring the pizza onto them. Using two pans increases heat retention and gets you a bit closer to the strong bottom heat a pizza stone provides.
That said, if your goal is the most classic Roman-style texture possible, a pizza stone is still the better option. I think of the sheet pan as the practical fallback, and the stone as the ideal setup.
What toppings are best for Roman-style pizza?
The best toppings are simple, balanced, and used with restraint. Roman-style pizza shines when you let just a few ingredients do the work. That’s why classics like pizza bianca, pizza rossa, potato and rosemary, or zucchini with herbs work so well. I also love combinations like prosciutto and cherry tomato, or mortadella, pistachio, and burrata. The crust is such a big part of the experience here—you don’t want to bury it.
Should mozzarella go on top of the toppings?
Not for the style I make here. When I use fresh mozzarella di bufala, I place it directly over the oiled dough, then add the other toppings over it. It melts into the crust and creates a flavorful base, while the toppings still get a chance to roast properly. That’s quite different from the thick cheese blanket you see on many North American pizzas, and I think it suits pizza romana much better.

Can I use burrata on Roman-style pizza?
Yes, but burrata is best added after baking, not before. It’s a finishing cheese, not a baking cheese. Tear it over the hot pizza just before serving so it stays cool, creamy, and luxurious instead of melting away in the oven.
Do I need cornmeal to shape Roman-style pizza?
No—and I personally prefer not to use it. Flour is all you really need to keep the dough from sticking. Cornmeal can add extra crunch and a distinct flavor, which some people like, but it changes the texture and makes the crust feel less true to the style of pizza I sampled and fell in love with in Rome.
Roman-Style Pizza Dough Recipe
Ingredients
- 2 tsp granulated sugar
- 1 ½ tsp active dry yeast
- 2 ½ tbsp extra-virgin olive oil, divided
- 1 tsp kosher salt
- 2 ¼ cups all-purpose flour, plus more for dusting
Instructions
Make the pizza dough
- Combine ¾ cup warm water (100°-115°F / 38-46°C), sugar, and yeast in a large bowl; let sit until spongy, 4-5 minutes. Mix in 1 ½ tbsp of the olive oil and the salt. Stir in 2 ¼ cups of the flour. Turn out onto a work surface; knead until smooth and elastic, adding more flour when the dough is sticking, about 6 minutes total. Grease a large bowl with 1 tablespoon olive oil. Add dough, cover bowl with plastic; let rise until doubled, about 90 minutes.
- Meanwhile, position one rack in the top third of the oven and another in the bottom third; place a pizza stone on the top rack and preheat the oven to 475°F (245°C). Preheat for 45 to 60 minutes.
- Divide the dough in half. At this point, you can wrap the dough balls individually in plastic wrap and store in the refrigerator for a couple of days, or store in a plastic storage bag in the freezer for 1 to 2 months.
Shape the Roman pizza dough
- Cut out a sheet of parchment paper that is the same size as your pizza stone. (See note.) Place the ball of pizza dough over the parchment paper. Using your hands, spread the dough into a very thin, large rectangle with rounded corners, sprinkling it with a bit of flour if it sticks. The thinner you spread out the dough, the crunchier the crust will be.
- Cover the dough with a clean kitchen towel and let rest for 15 minutes.
- Using a large cutting board or the back of a large baking sheet, carefully transfer the pizza (with the parchment paper) onto the preheated pizza stone in the oven. Bake until the crust is browned and crisp and the cheese is bubbly, about 9 minutes.
- SERVING: Pull the pizza out of the oven. Garnish as desired, and serve immediately.
Video
Notes
Did you make this?
Tell me how you liked it! Leave a comment or take a picture and tag it with @foodnouveau on Instagram.
Zucchini and Thyme Roman-Style Pizza Recipe
Ingredients
- 1 ball homemade Roman-style pizza dough (half a batch)
- ¼ cup extra-virgin olive oil
- 1 clove garlic
- ⅓ cup finely grated Parmigiano-Reggiano cheese
- 2 small zucchini (about 7 oz / 200 g)
- Fleur de sel, or flaky sea salt
- Freshly ground black pepper
- 1 ball mozzarella di bufala (about 5 oz / 140 g), sliced thinly or torn into pieces
- 1 tbsp fresh thyme leaves
- 1 ball burrata cheese (optional)
Instructions
Prepare the Ingredients
- Pour the olive oil in a small bowl. Very finely mince or grate the garlic clove using a Microplane, then mix it into the oil. Set aside to infuse. (You can prepare the garlic oil ahead of time; refrigerate until needed.)
- Slice both zucchini in extra-thin slices (a mandoline slicer is the best tool to do this).
Preheat the Pizza Stone
- Position a rack in the lower third of the oven. Place a pizza stone on the rack and preheat the oven to 475°F (245°C). Preheat for 45 to 60 minutes to allow the stone to absorb as much heat as possible.
Shape the Roman Pizza Dough
- Cut out a sheet of parchment paper that is the same size as your pizza stone. (See note.) Place the ball of pizza dough over the parchment paper. Using your hands, spread out the dough in a very thin, large rectangle with rounded corners, sprinkling the dough with a bit of flour if it sticks. The thinner you spread out the dough, the crunchier the crust will be.
- Cover the crust with a clean kitchen towel and let rest for 15 minutes.
Garnish and Bake the Zucchini Pizza
- Generously brush the pizza crust with garlic-infused olive oil.
- Sprinkle with the grated Parmigiano-Reggiano, then distribute the buffalo mozzarella over the crust. Set the thin zucchini slices over the cheese in an overlapping pattern.
- Season the zucchini with a generous pinch of fleur de sel (zucchini needs to be seasoned properly to be flavorful) and some black pepper. Sprinkle with the remaining Parmigiano-Reggiano and drizzle with the remaining garlic-infused olive oil.
- Using a large cutting board or the back of a large baking sheet, carefully transfer the pizza (with the parchment paper) onto the preheated pizza stone in the oven. Bake until the crust is browned and crisp and the cheese is bubbly, about 9 minutes.
- SERVING: Pull the pizza out of the oven. Set the burrata over the hot pizza, breaking it up to open it. Drizzle the burrata with olive oil and sprinkle with flaky sea salt and black pepper. Garnish with fresh thyme leaves and serve immediately.
Video
Notes
Did you make this?
Tell me how you liked it! Leave a comment or take a picture and tag it with @foodnouveau on Instagram.
This site is a participant in the Amazon Associates Program, an affiliate advertising program designed to provide a means for the site to earn fees by linking to Amazon and affiliated sites.
If you click on an affiliate link, I may earn advertising or referral fees if you make a purchase through such links, at no extra cost to you. This helps me create new content for the blog–so thank you! Learn more about advertising on this site by reading my Disclosure Policy.
Author: Marie Asselin
This recipe is primo. Pictures on @sapphirediva7 on instagram. This crust is perfect, and makes great pizzas, but wow, the zucchini is out of this world with the garlic, salt and thyme, plus this great crispy crust.
I saw your beautiful pictures on Insta, well done! The pizza looks just as delicious as the ones I’ve had in Rome 😍
Our favorite dough. And love the zucchini version so much which surprised me. One of our all time favorites.
So happy you’ve been enjoying my Roman pizza recipes! The zucchini version is so satisfying and I agree that it often comes as a surprise how delicious it is!
You say set the oven temperature to 500 F, and use parchment paper underneath the dough while baking. But most parchment paper burns at 450 degrees. Please explain.
Hey Johnny, I think because the parchment paper is set on the pizza stone and most of it rests under the pizza, it’s sort of “protected” from burning. I’ve been using parchment paper forever and while the edges of the parchment around the pizza do brown a bit, it doesn’t burn. It’s so handy to slide the pizza in and out of the oven!
Just found this as I was craving Roman-style pizza..I stop by Forno Campo Di Fiori every time I’m in Rome…usually multiple times! Thanks!
We spent a month in Rome this spring and enjoyed many, many pizzas. Your website saved me hours of research. We enjoyed both your pizzas and they were as good as in Rome. I use a bread machine to make a double portion of dough, divide it into four parts, and freeze them. Thawed dough is relaxed and a lot easier to roll and stretch. I have a steel, 16 inch perforated pizza form and it works well. I have not found a large enough pizza stone to suit me. I am thinking of cutting down a large floor tile to fit my stove. I have photos to share, but don’t know how to send them to you. I am looking for more toppings.
I agree, the parchment makes this whole process doable. I used commercially prepared dough and still had great results. I also used the Cuisinart processor to cut the zucchini evenly and thinly. The pizza was wonderful and I have referred to your blog. Also, my second pizza was a base of homemade pesto, mozzarella, coppociola, fresh herbs and parmesan regianno. Superb. You can even make it ahead of your guests’ arrival and reheat it for 5 minutes at 400.
Tried the zucchini pizza today.. My LORD! It`s the mother of all pizzas! Thank you <3
this blog rules
The best pizza a ever tasted . Forno in Rome
Hi, this recipe looks and sounds amazing. I can’t wait to try it. Can someone tell me how long this dough can keep in the fridge and freezer? make ahead would be ideal! Thanks :)
You can keep the dough wrapped in plastic wrap and a freezer-safe resealable bag for 24 hours in the fridge and up to a month in the freezer. Thaw overnight in the fridge or at room temperature for at least 30 minutes.