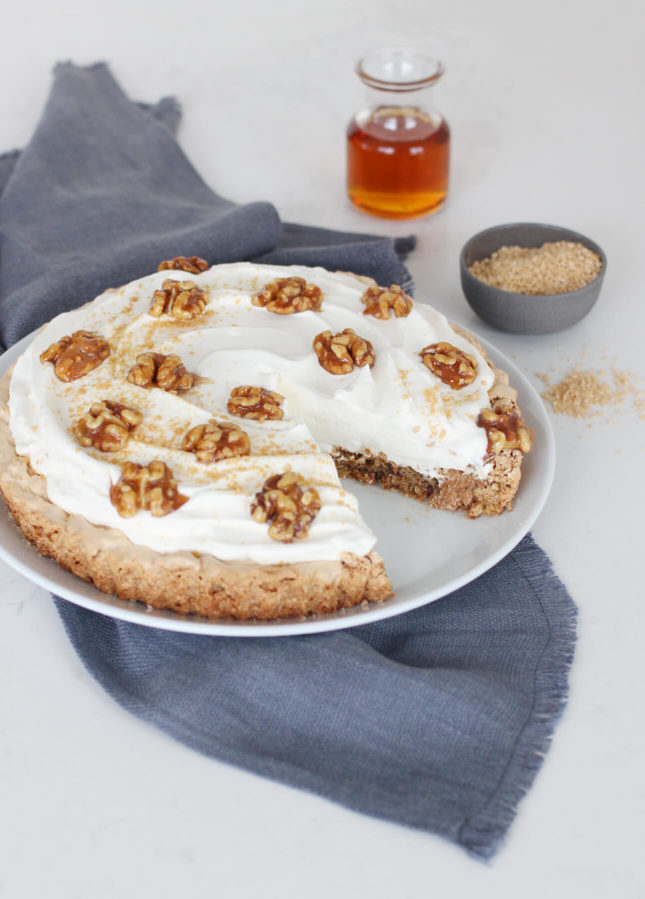
Walnut and Maple Cream Tart
This elegant maple cream tart deliciously highlights maple products. The meringue crust is crisp on the outside and pillowy on the inside. A cloud-like delight!
Servings 1 1 9-inch (23-cm) tart.
Ingredients
For the crust
- 1/2 cup 125 ml granulated maple sugar (substitute the same amount of regular granulated sugar if you can’t find maple sugar)
- 1/2 cup 125 ml granulated sugar
- 3 large egg whites room temperature
- Pinch of kosher salt or fine sea salt
- 2 tbsp 30 ml maple syrup
- 3/4 cup 180 ml finely chopped or coarsely ground toasted walnuts
- 3/4 cup 180 ml crushed unsalted soda crackers (or unsalted water crackers)
- 1 tsp 5 ml baking powder
- For the candied walnuts to decorate, optional
- 1/4 cup 60 ml maple syrup
- 16 walnut halves
For the whipped topping
- 1 cup 250 ml heavy whipping cream (35% m.f.)
- 1/4 cup 60 ml maple syrup
To serve
- Coarse maple sugar optional
Instructions
- Preheat the oven at 350°F (175°C). Lightly grease the bottom and sides of a 9-inch (23-cm) tart pan with a removable bottom.
- In a small bowl, whisk together the maple sugar and granulated sugar. In the bowl of a stand mixer fitted with the whisk attachment, or in a large bowl if using a hand mixer, beat together the egg whites and salt at high speed until soft peaks form. Lower the speed and slowly add the sugar mixture, two spoonfuls at a time, until all the sugar is fully incorporated and stiff and glossy peaks form. Slowly mix in the maple syrup (do not overbeat!). In a bowl, combine the walnuts, crackers, and baking powder, then add to the egg white mixture and use a spatula to gently combine.
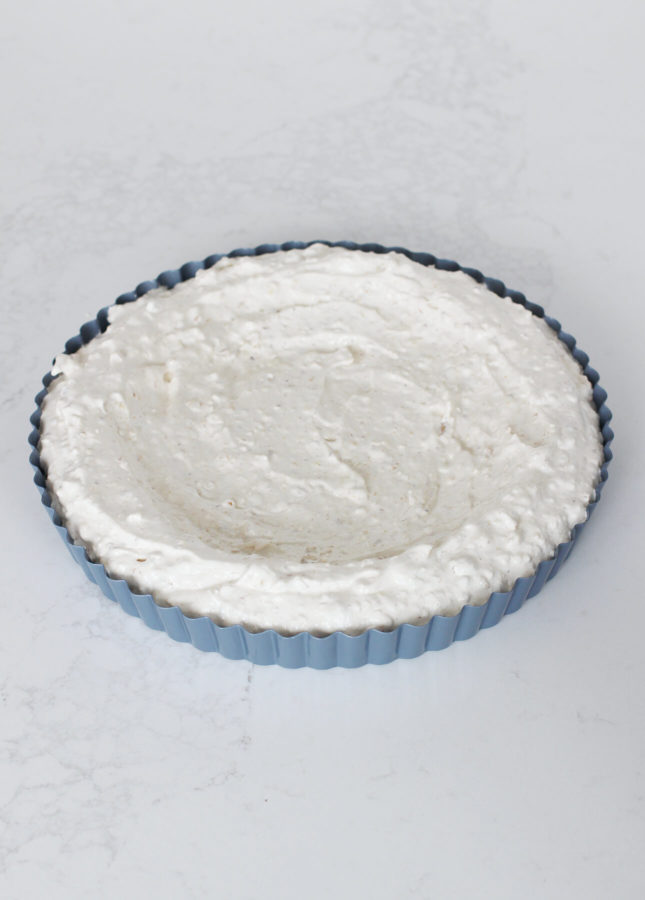
- Spread the crust mixture into the prepared tart pan, creating a well in the center to hold the maple whipped cream topping after baking.
- Bake the shell for 25 to 35 minutes or until the meringue is golden but not brown. Remove from the oven, and cool completely. Refrigerate the shell at least two hours, or preferably overnight.
To make the candied nuts: Line a baking sheet with parchment paper. In a nonstick skillet, combine the maple syrup and walnut halves, stirring to coat the nuts with syrup. Place the skillet over medium-high heat. The syrup will come to a simmer, then bubble up around the nuts. Using a silicon spatula, stir every few seconds. When the syrup is very sticky and the nuts are coated and shiny, take the skillet off the heat. Using a fork, lift the nuts out of the pan one at a time and transfer them to the parchment paper-lined baking sheet. Let the nuts cool completely (the syrup will harden as the nuts cool), then store in an airtight container. The nuts can be prepared several days in advance.
- SERVING: Whip the heavy cream to soft peaks. Add the maple syrup and whip to incorporate. Spread the cream over the refrigerated meringue crust. Decorate with the candied walnuts, then sprinkle with coarse maple sugar if desired. Serve within a few hours (keep refrigerated until service.)
- Recipe adapted from Food 52.
Did you make this?
Tell me how you liked it! Leave a comment or take a picture and tag it with @foodnouveau on Instagram.