- V
- GF
- NS
- DF
- View Recipe Key
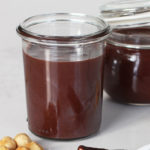
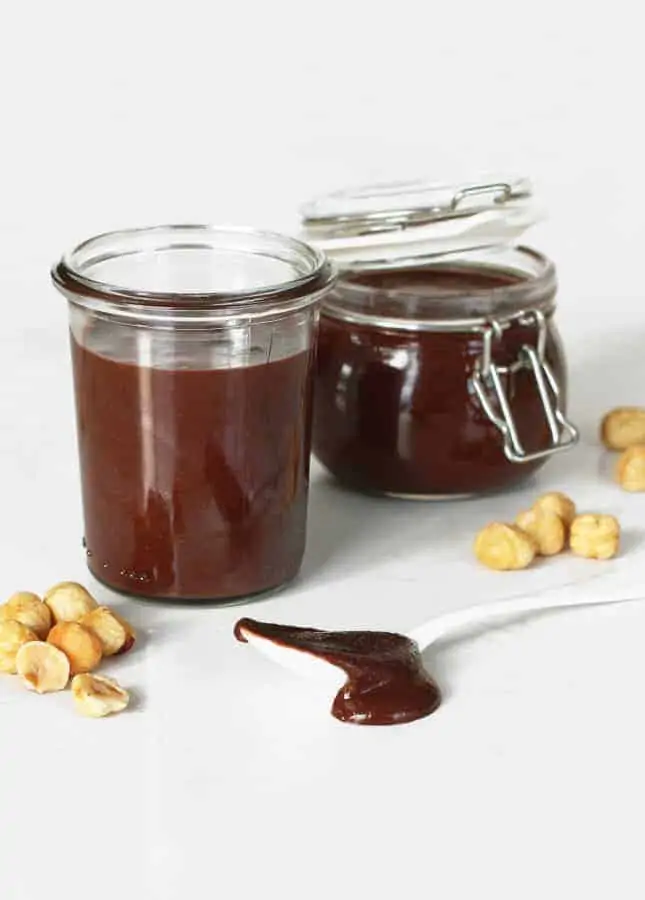
Dairy-Free Homemade Chocolate Hazelnut Spread
Dairy-Free Homemade Chocolate Hazelnut Spread

This dairy-free chocolate hazelnut spread has an intense, grown-up flavor. This luxurious treat will upgrade your breakfasts and desserts!
This post contains affiliate links. Full disclosure is at the bottom of the article.
The idea of making Nutella from scratch had been running through my mind ever since I bought a little jar of homemade chocolate and hazelnut spread at Le Grenier à Pain in Paris. While waiting in line at the bakery, I was eying the rows of homemade spreads they sold. All the jam varieties seemed delectable, but when I saw their chocolate and hazelnut spread, I knew I had to treat myself to one. Tasting homemade chocolate and hazelnut spread for the first time turned out to be a revelation. It was more intense in every way: a lot more chocolatey, a lot less sweet, and a lot nuttier. It was like the grown-up version of the store-bought stuff. After I came back home, I couldn’t resist the project of making my own.
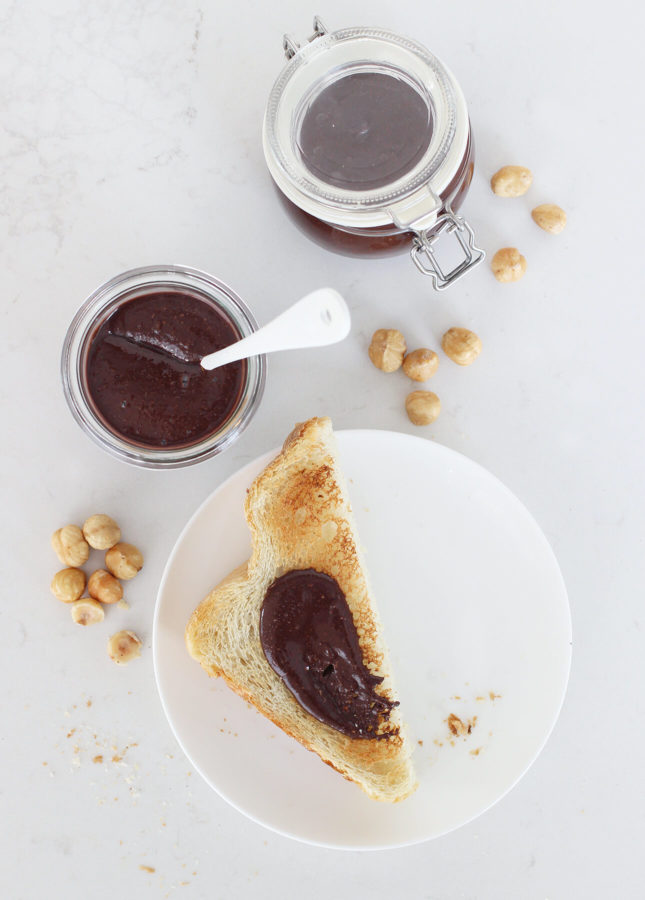
Making homemade chocolate and hazelnut spread is easy: if you have a food processor, you’re just a few steps away from a treat that will brighten up your mornings. Although I didn’t grow up with a jar of Nutella sitting on the breakfast table, it’s now something I like to treat myself to from time to time. Placing a jar of homemade chocolate and hazelnut spread on the table feels truly luxurious! Starting my day with a slice of banana bread slathered thick with homemade chocolate and hazelnut spread is a sure way to make me smile.
But don’t confine the use of this delightful homemade chocolate and hazelnut spread to mornings only: it’s a luxurious sidekick for Torta di Nocciole—Italian Hazelnut Cake—and a delightful topping for homemade gelato. Drizzle if over your morning granola, add it to a banana smoothie, or heck, even treat yourself to a spoonful: your secret is safe with me.
Tips for Making Chocolate Hazelnut Spread
- Hazelnuts can be sold under different names: Raw hazelnuts are sometimes packaged as “filberts.” Filberts and hazelnuts are one and the same! (Read why hazelnuts go by several names.)
- Hazelnuts are easy to peel: Roast hazelnuts to peel them super easily. To roast and peel hazelnuts, spread them over a baking sheet and bake at 350°F (170°C) for 15 minutes, giving the tray a good shake every five minutes. When the skin of the hazelnuts is shiny and crackled, remove from the oven and transfer to a clean dish towel. Close the towel up into a bundle and rub the hazelnuts against one another vigorously to remove the skin. Open the towel and pick up the peeled hazelnuts. Some bits of skin will remain and that’s ok, simply make sure to discard all the loose papery bits. Keep the roasted hazelnuts in an airtight container in the fridge until ready to use.
- Look for roasted and peeled hazelnuts to save time: Some companies, such as Yupik in Canada and AZNUT in the US, sell unsalted roasted hazelnuts. These are more expensive, but a huge time saver. Nuts are expensive and using stale nuts in a dessert is such an awful waste! Make sure to buy roasted nuts packaged by a trusted company and from a store with a high turnover to make sure they are fresh.
- Always store unused nuts in the fridge: Nuts are expensive, so you should make sure to treat them with extra care. All nuts will turn rancid when they’re not properly stored, but I find hazelnuts to be especially sensitive to spoilage. Nuts will turn rancid within a couple of weeks when stored at room temperature (such as in a pantry.) You shouldn’t store nuts in the freezer, which is too harsh an environment. Refrigerator freezers are not made for lengthy store and cause freezer burns, which damages food and renders it inedible. Unused nuts should be stored in airtight containers in the refrigerator: this will keep them fresh for months.
- Store homemade chocolate hazelnut spread in the refrigerator, too: While the spread will stiffen up a bit upon refrigeration, it remains spreadable. Refrigerating the spread will keep it fresh for up to two weeks and prevent it from turning rancid. You can fully return homemade chocolate hazelnut spread to its gooey state by letting it sit at room temperature for 20 minutes.
Dairy-Free Chocolate Hazelnut Spread
Ingredients
- 7.5 oz whole hazelnuts, roasted and peeled (1 ½ cups, see note)
- 2/3 cup powdered sugar
- 1/3 cup Dutch-processed (dark) cocoa powder
- 1/4 tsp kosher salt or fine sea salt
- 2 tbsp hazelnut oil, or a neutral-tasting oil such as canola, sunflower, or grapeseed
Instructions
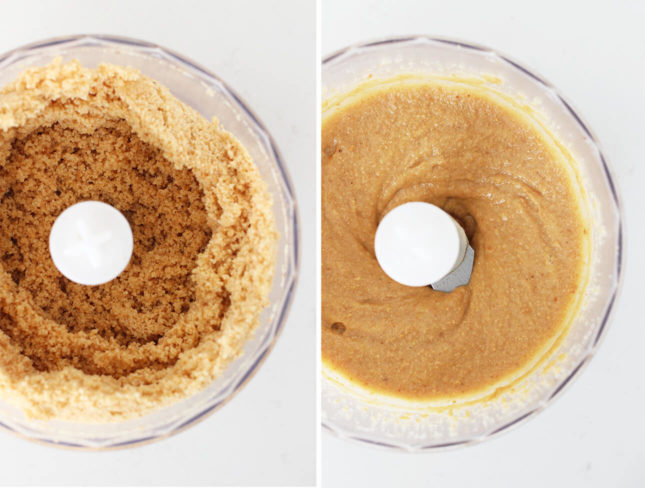
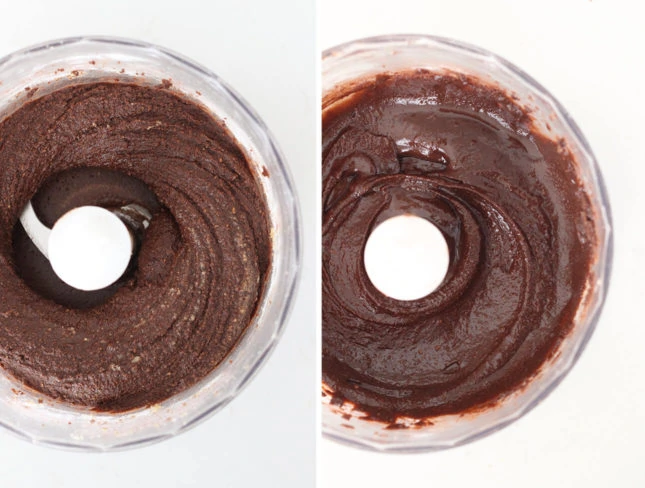
- Add the roasted, skinned, and cooled hazelnuts to the bowl of a food processor. Process until the hazelnuts turn to a smooth paste, 4 to 5 minutes. Scrape the bowl a few times to make sure the hazelnuts blend to an even texture.

- When the nuts reach a smooth consistency (like a thick, spreadable butter), add the powdered sugar, cocoa powder, and salt. Process again until well blended. The mixture will be very thick at this point. Scrape down the bowl thoroughly.
- Add 1 tbsp of the oil, then process for 30 seconds. Scrape down the bowl and process for 30 seconds more. Check the texture: homemade chocolate-hazelnut spread should be smooth and spreadable—it should slowly drip down the side of a spoon. Add more oil if the mixture looks stiff.
- SERVING: Serve with any and all breakfast treats for a delightful morning upgrade, or with cake and gelato for a luxurious dessert.
- STORAGE: Transfer the homemade chocolate hazelnut spread to a clean, airtight jar. Store in the refrigerator for up to 2 weeks. The treat remains spreadable when cold, but you can fully return it to its gooey state by letting it sit at room temperature for 20 minutes.
Notes
Did you make this?
Tell me how you liked it! Leave a comment or take a picture and tag it with @foodnouveau on Instagram.
This site is a participant in the Amazon Associates Program, an affiliate advertising program designed to provide a means for the site to earn fees by linking to Amazon and affiliated sites.
If you click on an affiliate link, I may earn advertising or referral fees if you make a purchase through such links, at no extra cost to you. This helps me creating new content for the blog–so thank you! Learn more about advertising on this site by reading my Disclosure Policy.
Author: Marie Asselin
Both the homemade hazelnut spread and the cake are beautiful. I sort of missed the boat on Nutella day and was only clued in after seeing all the related posts. I’ll have to try this cake and perhaps the spread, too. But I have to first eat the two large jars of Nutella I have in my pantry!
Lovely torta! And homemade Nutella, I have to try it too.
Wow! I would never have thought to make my own hazelnut chocolate spread, but this looks amazing! I’d love for you to submit this to the M&T Spotlight: http://www.makeandtakes.com/spotlight
Love this little torta
That tall cake is haunting me: hazelnuts! With lemon! And homemade Nutella! What a combo.
That looks SO good. I have made homemade Nutella one time and it was a little grainy, too, but SO good.
I want to make everything on the Nutella World Day page! ;)
I am soo happyyy to find ur blog , thannxx to World Nutella day!
These cakes are soo good and i lovee baking in ramekins!
UR home made nutella looks perfectly good!
Am sure bookmarking this page:-)
Happy day!
YUMMY! i love hazelnut with a touch of lemon..My inspirational juices are flowing ! GREAT JOB!
I had never tried hazelnut, chocolat and lemon together before but this is a winner! It’s as delicious as it looks!
when I`m looking at this I`m really hungry :) with such delicious combo it must be awesome! I`m so glad I found your blog and I`m going to stop by your blog more often :)
Very happy that my Nutella post allowed you to discover my blog! I hope you’ll keep on coming back for more :)
Well done that looks better then the real thing! I really want to try it now. I made my own Bourbon biscuits the other day and was surprised how easy it was. It’s inspiring, thnaks!!
The great thing about making our own homemade versions of well-known products is that, for sure, they are healthier just because they contain less additives and “unknown” ingredients (you know, those with the names we can’t pronounce). I love my grown-up Nutella so much that I may be very well alternate between traditional Nutella (for old times’ sakes) and my own homemade version! It’s easy to do and very satisfying.